视频
maven下载和安装,1,2,3
postman安装使用教程,1
–
视频文档链接:
https://www.yuque.com/zaibaliweigezidemeixi/dopm5h
密码:mp6h
代码:
spring boot: https://github.com/coder-fengzhu/boot-demo
mybatis-plus: https://github.com/coder-fengzhu/mp-demo
项目结构
后端
- api层:接收前端浏览器的客户端http请求–get、post、put、delete(controller层)
- serveice层:实现具体的业务逻辑,
- data access层:访问数据库—关系型数据库的表结构转化为java的对象
初始化
初始化springboot应用 https://start.spring.io/
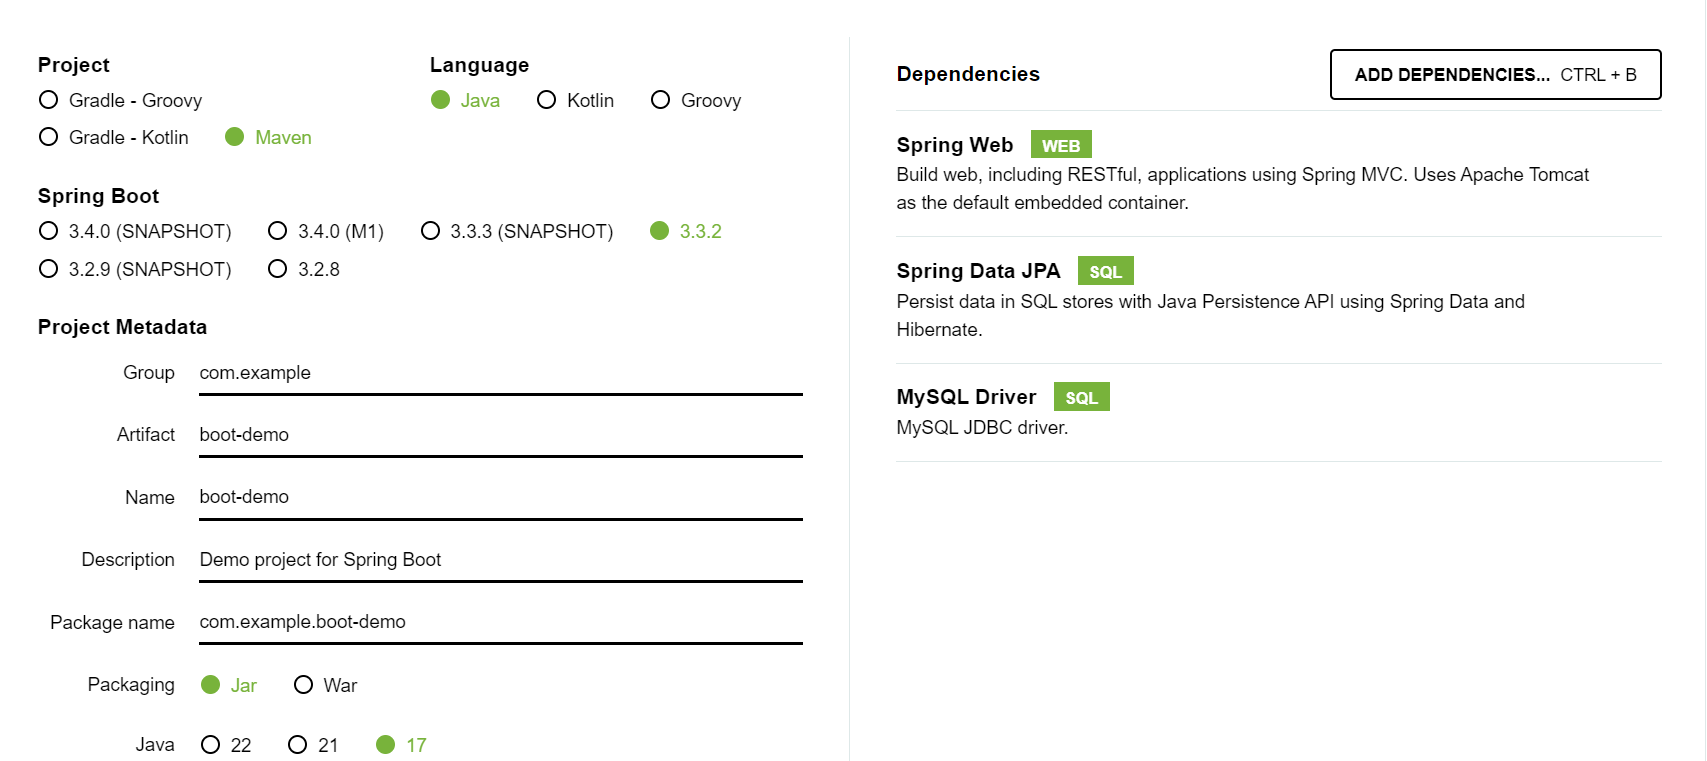
依赖spring web,spring data jpa,mysql driver
IDE导入生成的代码 open 选择pom.xml文件-openasproject(需要下载maven,并配置maven路径)
项目结构:
- scr-main-java —java相关文件
- resources–前端静态文件或者配置文件
- application.properties–全局的配置文件
- test–
- pom.xml—配置的依赖文件
启动应用
–BootDemoApplication运行main方法–访问http://localhost:8080/
报错 DataSource: ‘url’ attribute is not specified and no embedded datasource could be configured.因为引入了jpa需要对数据库进行访问。先注释掉依赖,再启动
创建controller
–所有的api都是由controller的方式提供的
Spring会将java对象通过Json序列化成为一个json字符串来返回。如果是自定义对象,属性要实现getset方法,不然没办法转化为接送字符串
 1
 2
 3
 4
 5
 6
 7
 8
 9
10
11
12
13
14
15
16
17
18
19
20
|
@RestController//注解用于将一个类标识为Spring MVC的Controller
public class TestController {

    @GetMapping("/hello")//配置访问的路径
    public String hello(){

        return "hello world";
    }
}
//hello world

@RestController//注解用于将一个类标识为Spring MVC的Controller
public class TestController {

    @GetMapping("/hello")//配置访问的路径
    public List<String> hello(){
        return List.of("hello","world");
    }
}
//返回的是接送数组["hello","world"]
|
rest api 规范
-
Http 动词
-
GET(SELECT):从服务器取出资源(一项或多项)。
-
POST(CREATE):在服务器新建一个资源。
-
PUT(UPDATE):在服务器更新资源(客户端提供改变后的完整资源)。
-
PATCH(UPDATE):在服务器更新资源(客户端提供改变的属性)。
-
DELETE(DELETE):从服务器删除资源。
创建数据库表
 1
 2
 3
 4
 5
 6
 7
 8
 9
10
|
CREATE DATABASE test
  CHARACTER SET utf8mb4
  COLLATE utf8mb4_general_ci;

CREATE TABLE student (
  id INT AUTO_INCREMENT PRIMARY KEY,# 自增主键
  name VARCHAR(50) NOT NULL,
  email VARCHAR(100) NOT NULL,
  age INT
);
|
配置数据库路径
application.properties
1
2
3
|
spring.datasource.url=jdbc:mysql://localhost:3306/test?characterEncoding=utf-8
spring.datasource.username=root
spring.datasource.password=123456
|
data access层 dao层
数据访问层
maven标红-添加版本
将数据库中的数据映射到java对象中
 1
 2
 3
 4
 5
 6
 7
 8
 9
10
11
12
13
14
15
16
17
18
19
20
21
22
23
24
25
26
27
28
|
//将数据库中的数据映射到java对象中
@Entity
@Table(name = "student")
public class Student {

    @Id//自增的主键
    @Column(name = "id")//指定数据库字段
    @GeneratedValue(strategy = IDENTITY)//自增id,数据由数据库生成
    private long id;

    @Column(name = "name")
    private String name;

    @Column(name = "email")
    private String email;

    @Column(name = "age")
    private int age;

    //并生成getset方法
}


@Repository//标注在数据访问层(DAO层)的类,明确了这个类的主要职责是进行数据访问操作
//继承 JpaRepository<T, ID> 接口,自动获得了对 Student 实体类的数据访问能力
//为 StudentRespository 接口创建一个代理实现,这个实现会处理所有的数据访问操作
public interface StudentRespository extends JpaRepository<Student,Long> {//<对象,主键类型>
}
|
service层
 1
 2
 3
 4
 5
 6
 7
 8
 9
10
11
12
13
14
15
16
17
18
19
|
public interface StudentService {
	//关于getStudentById方法的具体实现,它并不在接口中定义。
    // 接口只声明了方法的签名(即方法的名称、参数列表和返回类型),而不提供方法的实现体。
    // 实现体(即方法的实际代码)需要在实现该接口的类中提供。
    Student getStudentById(long id);
}


@Service//加入到spring容器中,方便对应的对象注入
public class StudentServiceImpl implements StudentService{

    @Autowired
    private StudentRespository studentRespository;
    @Override
    public Student getStudentById(long id) {
        //通过id返回student对象
        return studentRespository.findById(id).orElseThrow(RuntimeException::new);
    }
}
|
contrller层
 1
 2
 3
 4
 5
 6
 7
 8
 9
10
11
12
13
14
15
16
17
18
|
@RestController
public class StudentController {

    //注入server层代码
    @Autowired
    private StudentService studentService;

    @GetMapping("student/{id}")//查询
    public Student getStudentById(@PathVariable long id){//路径变量,上面定义的id

		//返回json串
        return studentService.getStudentById(id);

    }
}

http://localhost:8080/student/1
{"id":1,"name":"eric","email":"abc@123.com","age":20}
|
dto层
controller直接将数据库对象返回,dto层用于返回展示给前端的对象,将数据库的student对象转化为需要展示的对象studentdto
并修改service、controller层需要传输的对象
 1
 2
 3
 4
 5
 6
 7
 8
 9
10
11
|
public class StudentConverter {
    //将数据库中的student对象转为需要返回给前端的studentdto对象
    // 静态方法
    public static StudentDTO converterStudet(Student student){
        StudentDTO studentDTO =new StudentDTO();
        studentDTO.setId(student.getId());
        studentDTO.setName(student.getName());
        studentDTO.setEmail(student.getEmail());
        return studentDTO;
    }
}
|
Response类
接口规范标准需要返回一些信息,后端是否有报错返回正常,错误信息,作为后端结果的统一封装。用于前端通过一些字段去判断接口请求是否正常。加上错误信息和状态码信息
并修改controller层返回的对象
 1
 2
 3
 4
 5
 6
 7
 8
 9
10
11
12
13
14
15
16
17
18
19
20
21
22
23
24
25
26
27
28
29
|
public class Response <T>{
    private T data;//T 泛型
    private boolean success;//请求是否成功
    private String errorMsg;//错误信息

    //封装一些静态方法,更好调用
    //新建一个返回成功的response
    public static <K> Response<K> newSuccess(K data) {
        Response<K> response = new Response<>();
        response.setData(data);
        response.setSuccess(true);
        return response;
    }
    //返回失败的response
    public static Response<Void> newFail(String errorMsg) {
        Response<Void> response = new Response<>();
        response.setErrorMsg(errorMsg);
        response.setSuccess(false);
        return response;
    }
    //get。set方法
}

@GetMapping("student/{id}")//查询
    public Response<StudentDTO> getStudentById(@PathVariable long id){//路径变量,上面定义的id

        return Response.newSuccess(studentService.getStudentById(id));

    }
|
重新启动得到新的json串
1
2
3
4
5
6
7
8
9
|
{
  "data": {
    "id": 1,
    "name": "eric",
    "email": "abc@123.com"
  },
  "success": true,
  "errorMsg": null
}
|
上述便完整实现了get接口(查询接口)。
post-新增接口
controller层添加接口
1
2
3
4
5
6
7
|
@PostMapping("/student")
    //返回id即可
    public Response<Long> addNewStudent(@RequestBody StudentDTO studentDTO){//用于接收前端的json串,并反序列化为StudentDTO对象
        //一般会做一下校验
        return Response.newSuccess(studentService.addNewStudent(studentDTO));

    }
|
dao层实现findbyemail方法用于检查唯一性
1
2
3
|
	//jpa中findby按照字段的方法,按照约定的配置会自动根据去查询对应的数据,就不需要手写sql
    //在复杂场景下才需要手写
    List<Student> findByEmail(String email);
|
service层添加接口addNewStudent方法,并实现该接口,并将dto对象转为数据库student对象
 1
 2
 3
 4
 5
 6
 7
 8
 9
10
11
12
13
14
15
16
17
18
19
20
21
22
23
24
25
26
|
//service interface接口
Long addNewStudent(StudentDTO studentDTO);

	//impl具体实现
	@Override
    public Long addNewStudent(StudentDTO studentDTO) {
        //检查email的唯一性,没有findbyemail方法需要在Respository中实现
        List<Student> studentList = studentRespository.findByEmail(studentDTO.getEmail());
        if(!CollectionUtils.isEmpty(studentList)){
            //如果非空说明邮箱被占用,抛出异常
            throw new IllegalStateException("emil"+studentDTO.getEmail()+"has been taken");

        }
        //将接口的dto对象转为student对象
        Student student=studentRespository.save(StudentConverter.converterStudet(studentDTO));
        return student.getId();
    }

 	//studentDto转为student对象
    public static Student converterStudet(StudentDTO studentDTO){
        Student student =new Student();

        student.setName(studentDTO.getName());
        student.setEmail(studentDTO.getEmail());
        return student;
    }
|
利用postman去测试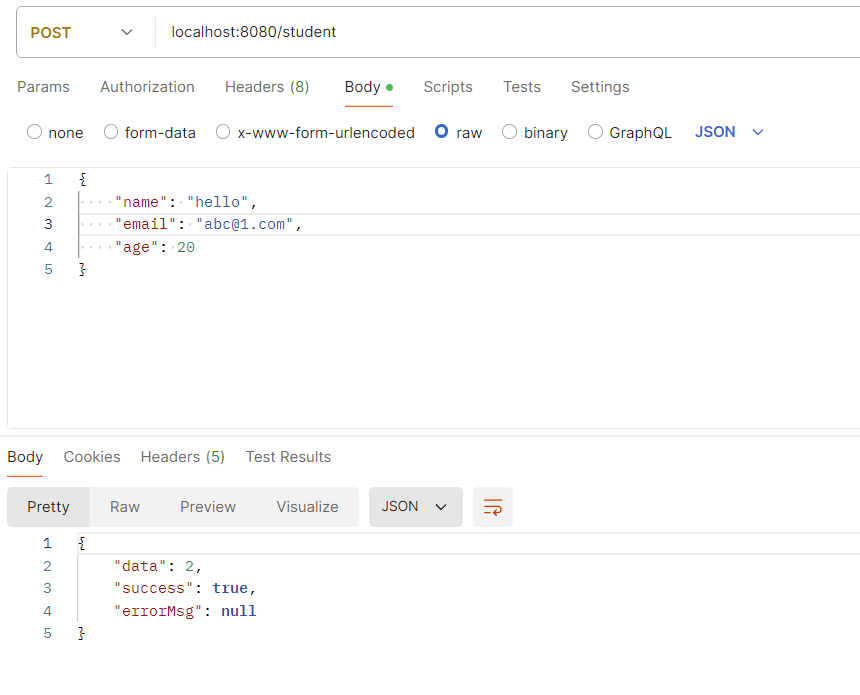 ,
,
重复email报错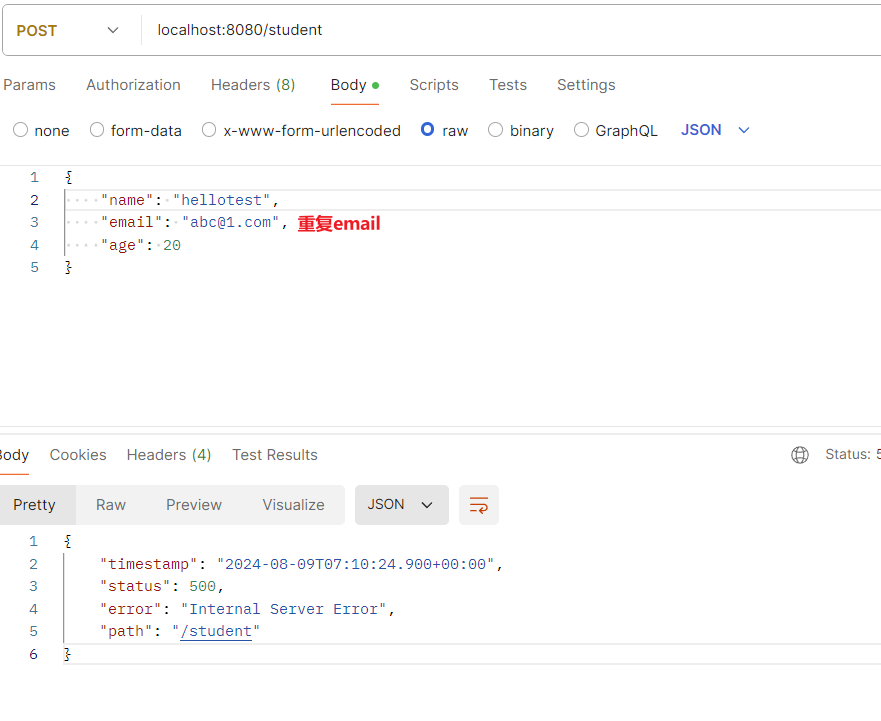
但上述并没有上传age,修改为直接上传student对象,则包含age
delete–删除接口
controller层添加接口
1
2
3
4
|
	@DeleteMapping ("student/{id}")
    public void deleteStudentById(@PathVariable long id){
        studentService.deleteStudentById(id);
    }
|
service添加接口,并实现
1
2
3
4
5
6
7
8
9
|
void deleteStudentById(long id);

	@Override
    public void deleteStudentById(long id) {
        //判断id是否存在
        studentRespository.findById(id).orElseThrow(()->new IllegalArgumentException("id"+id+"doesn't exist"));
        studentRespository.deleteById(id);

    }
|
put–更新接口
1
2
3
4
5
6
7
8
|
	@PutMapping("/student/{id}")
    public Response<StudentDTO> updateStudentById(@PathVariable long id,
                                                  //更新email和age的时候,可能是非空,所以用requestparam而不是json去传递参数
                                                  @RequestParam(required=false) String name,
                                                  @RequestParam(required=false) String email
                                                  ){
        return Response.newSuccess(studentService.updateStudentById(id,name,email));
    }
|
 1
 2
 3
 4
 5
 6
 7
 8
 9
10
11
12
13
14
15
16
17
18
19
20
21
22
23
|
StudentDTO updateStudentById(long id, String name, String email);

	@Override
    //Spring 容器会在这个方法执行时启动一个事务,并在方法结束时根据方法的执行结果来提交或回滚事务。
    //如果在修改过程中发生异常或错误,那么事务可以回滚到修改之前的状态,从而保持数据的一致性
    @Transactional
    public StudentDTO updateStudentById(long id, String name, String email) {
        Student studentInDB=studentRespository.findById(id).orElseThrow(()->new IllegalArgumentException("id"+id+"doesn't exist"));

        //name空的话不更新,非空且不一致才更新
        if(StringUtils.hasLength(name)&& !studentInDB.getName().equals(name)){
            studentInDB.setName(name);
        }

        if(StringUtils.hasLength(email)&& !studentInDB.getEmail().equals(email)){
            studentInDB.setEmail(email);
        }
        Student student=studentRespository.save(studentInDB);

        //判断一下是否一致,是否还要新建,true,无须新建
//        System.out.println(student.equals(studentInDB));
        return StudentConverter.converterStudet(student);
    }
|
打包项目
 1
 2
 3
 4
 5
 6
 7
 8
 9
10
|
#打包
mvn clean install

cd D:\Java\project\boot-demo\boot-demo\target\
#启动项目
java -jar boot-demo-0.0.1-SNAPSHOT.jar

# 修改端口号
java -jar boot-demo-0.0.1-SNAPSHOT.jar --server.port=8081
|
MYSQL:包含jdbchttps://www.bilibili.com/video/BV15m421T7RQ/?spm_id_from=333.788&vd_source=ad42090d7d6fcdfc144126ae0e2884ac
jpa:https://www.bilibili.com/video/BV17m421M7CY/?spm_id_from=333.788&vd_source=ad42090d7d6fcdfc144126ae0e2884ac
mybatis:https://www.bilibili.com/video/BV18s421M7VV/?spm_id_from=333.788&vd_source=ad42090d7d6fcdfc144126ae0e2884ac
1
2
3
4
5
6
7
8
|
create table user(
id int AUTO_INCREMENT comment"自增主键" primary key,
username char(10)null comment"用户名",
passuord varchar(18)null COMMENT "密码",
nickname varchar(50)null COMMENT "昵称",
phone varchar(11)null comment "电话",
email varchar(50)null comment"邮箱")
comment"用户表"
|