青戈-带小白做毕设系列学习
视频
技术栈:
前端:html,css,javascript,vue,element-ui
后端:java,springboot,mybatis,mybatis-plus
数据库:mysql
服务器:腾讯云linux
小程序:uniapp -视频 -有手就会系列
后续工具:redis,RDM,natapp,Xshell&Xftp(服务器部署工具)
vue2,springboot2
html,css
JS
vue
视频
vue2:官网 ,教程
插件市场过慢:https://blog.csdn.net/m0_52163205/article/details/136241055
IDEA导入vue插件,https://www.jb51.net/javascript/320084g3g.htm
- {{}} 变量、表达式渲染
- v-html html模板,渲染html
- v-model 绑定值(双向绑定)
- v-if v-else-if v-else判断
- v-bind 简写:绑定属性
- V-on 简写@ 事件绑定
- V-for循环
- 动态class style
  1
  2
  3
  4
  5
  6
  7
  8
  9
 10
 11
 12
 13
 14
 15
 16
 17
 18
 19
 20
 21
 22
 23
 24
 25
 26
 27
 28
 29
 30
 31
 32
 33
 34
 35
 36
 37
 38
 39
 40
 41
 42
 43
 44
 45
 46
 47
 48
 49
 50
 51
 52
 53
 54
 55
 56
 57
 58
 59
 60
 61
 62
 63
 64
 65
 66
 67
 68
 69
 70
 71
 72
 73
 74
 75
 76
 77
 78
 79
 80
 81
 82
 83
 84
 85
 86
 87
 88
 89
 90
 91
 92
 93
 94
 95
 96
 97
 98
 99
100
101
102
|
<!DOCTYPE html>
<html lang="en">
<head>
<meta charset="UTF-8">
<title>Vue学习</title>
<!--样式-->
<style>
.active{
color: chartreuse;
}
</style>
</head>
<body>
<!--创建message变量-->
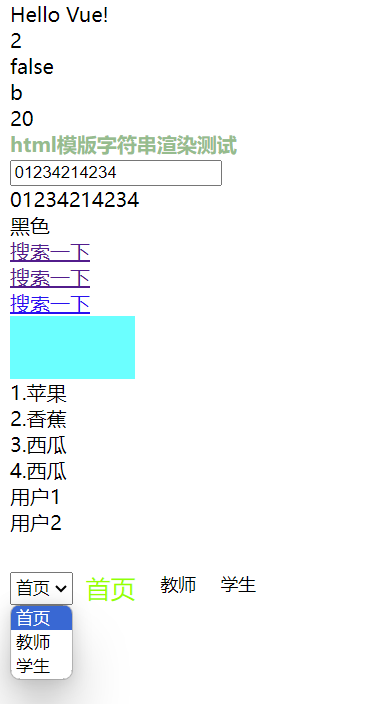
<div id="app">
{{ message }}
<!--num++不好用-->
<div>
{{num+1}}
</div>
<div>{{bool}}</div>
<div>{{bool ? 'a':'b'}}</div>
<div>{{arr.find(v=>v.name==='张三' )?.age}}</div>
<!-- html模版渲染-->
<div v-html="htmlStr"></div>
<!-- 绑定值,双向绑定,input框和div的值对应,同步展示-->
<div>
<input type="text" v-model="value">
<div>{{value}}</div>
</div>
<!--if,满足条件才进行渲染-->
<div>
<div v-if="color==='红色'">红色</div>
<div v-if="color==='蓝色'">蓝色</div>
<div v-else-if="color==='黑色'">黑色</div>
<div v-else>白色</div>
</div>
<!-- 绑定属性,简写为:-->
<div>
<a v-bind:href="url">搜索一下</a>
</div>
<!-- 简写,里面必须是字符串-->
<div><a :href="'https://www.baidu.com'">搜索一下</a></div>
<div><a :href="'url'">搜索一下</a></div>
<!-- 事件绑定 简写@,按钮,绑定一个click事件,改变样式-->
<!-- <div style="width: 100px;height: 50px;background-color: aqua" v-on:click="clickDiv" id="div"></div>-->
<div style="width: 100px;height: 50px;background-color: aqua" @click="clickDiv" id="div"></div>
<!-- 循环渲染 key:为每个元素提供一个索引-->
<div v-for="(item,index) in fruits" :key="index">{{index+1 +"."+item}}</div>
<div v-for="item in users":key="item.name">{{item.name}}</div>
<!-- 动态绑定class,水平排列-->
<div style="display: flex;margin-top: 30px">
<!-- 下拉框-->
<select v-model="currentMenu">
<option value="首页">首页</option>
<option value="教师">教师</option>
<option value="学生">学生</option>
</select>
<div style="padding: 0 10px" :style="{fontSize: item===currentMenu ? '20px':'14px'}" :class="{'active':item===currentMenu }" v-for="item in menus":key="item">{{item}}</div>
</div>
</div>
<script src="https://cdn.jsdelivr.net/npm/vue@2/dist/vue.js"></script>
<script>
//新的vue实例
var app = new Vue({
el: '#app',//element,vue实例绑定到div上,div的语法会基于这个vue生效
data: {
message: 'Hello Vue!',//将变量的值渲染为html字符串
num:1,
bool: false,
arr:[{name:'张三',age:20}],//数组
htmlStr:'<strong id="htmlId" style="color: darkseagreen">html模版字符串渲染测试</strong>',
value:'0',
color:'黑色',
url:'https://www.baidu.com',
fruits:['苹果','香蕉','西瓜','西瓜'],
users:[{name: '用户1 '},{name: '用户2'}],
menus: ['首页','教师','学生'],
currentMenu:'首页'
},
methods:{
clickDiv(){
console.log("点击了div")
let color =document.getElementById('div').style.backgroundColor
//点击 改变颜色
document.getElementById('div').style.backgroundColor=color==='blue'?'aqua':'blue'
document.getElementById('htmlId').style.color='gold'
}
}
})
</script>
</body>
</html>
|
Vue脚手架搭建
nodejs安装 官网,教程,1
vue cli 脚手架 官网
vuecli
 1
 2
 3
 4
 5
 6
 7
 8
 9
10
11
12
13
14
15
16
17
18
19
20
21
22
23
24
|
# 安装
npm config set registry http://registry.npm.taobao.org
npm install -g @vue/cli

C:\Windows\System32>VUE -VERSION
@vue/cli 5.0.8

# 创建项目vue
vue create vue

> Manually select features
>(*) Babel
>(*) Router
> 2.x
y
> In package.json
n

cd vue
npm run serve

  App running at:
  - Local:   http://localhost:8080/
  - Network: http://192.168.238.23:8080/
|
- src-views:放置页面源代码的位置
- assets:静态文件(图片,css,js的位置
- components:组件 vue文件,可以作为一个单独的引用–浓缩为一个标签
- router:路由,地址栏发生变化称为路由的切换,一个路由代表一个页面,把路由和页面联系起来
- main.js:全局对象的挂载,#app-div的id,new一个实例挂载到div中,所有的对象都会在div中去渲染
- package.json:vue工程的所有依赖
- vue.config.js:工程的全局配置文件
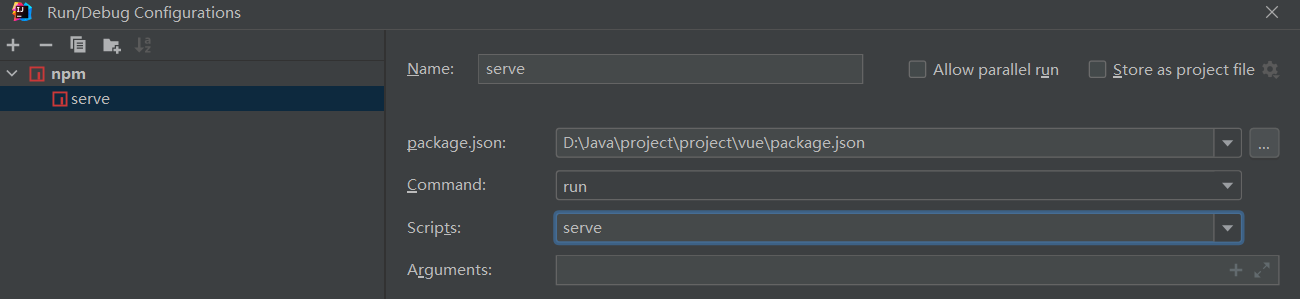
idea启动vue–清空内容
vue.config.js
 1
 2
 3
 4
 5
 6
 7
 8
 9
10
11
12
|
const { defineConfig } = require('@vue/cli-service')
module.exports = defineConfig({
  transpileDependencies: true,
  devServer:{
    port:7000
  },
   chainWebpack:config =>
      config.plugin('html').tap(args => {
        args[0].title = 'vue学习';
        return args;
      })
})
|
app.vue
1
2
3
4
5
|
<template>
  <div id="app">
    <router-view/>
  </div>
</template>
|
views-homeview.vue
 1
 2
 3
 4
 5
 6
 7
 8
 9
10
|
<template>
  <div>主页</div>
</template>

<script>

export default {
  name: 'HomeView',
}
</script>
|
router-index.js
 1
 2
 3
 4
 5
 6
 7
 8
 9
10
11
12
13
14
15
16
17
18
19
20
21
22
|
import Vue from 'vue'
import VueRouter from 'vue-router'

Vue.use(VueRouter)

const routes = [
  {
    path: '/',
    name: 'home',
    // component: HomeView
    component: () => import('../views/HomeView.vue')
  }
]

const router = new VueRouter({
  mode: 'history',
  base: process.env.BASE_URL,
  routes
})

export default router
|
assets-css-gloabl.css
 1
 2
 3
 4
 5
 6
 7
 8
 9
10
|
/*所有的元素都改为盒状模型*/
*{
    box-sizing: border-box;
}
body{
    color: #333;
    font-size: 14px;
    margin: 0;
    padding: 0;
}
|
main.js
 1
 2
 3
 4
 5
 6
 7
 8
 9
10
11
12
13
|
import Vue from 'vue'
import App from './App.vue'
import router from './router'

import '@/assets/css/global.css'

Vue.config.productionTip = false

new Vue({
  router,
  render: h => h(App)
}).$mount('#app')
|
ElementUI
ElementUI官网
安装
nrm管理镜像
1
2
3
4
5
6
7
8
|
# 安装
npm install -g nrm
# 镜像列表
nrm ls
# 切换镜像
nrm use taobao
# 当前镜像
nrm current
|
main.js引入elementui
1
2
3
4
|
import ElementUI from 'element-ui';
import 'element-ui/lib/theme-chalk/index.css';

Vue.use(ElementUI,{size:'small'});
|
并在route-index.js中配置路由-把路由和页面连接起来
1
2
3
4
5
|
{
  path: '/element',
  name: 'Element',
  component: () => import('../views/Element.vue')
}
|
views-element.vue 页面
  1
  2
  3
  4
  5
  6
  7
  8
  9
 10
 11
 12
 13
 14
 15
 16
 17
 18
 19
 20
 21
 22
 23
 24
 25
 26
 27
 28
 29
 30
 31
 32
 33
 34
 35
 36
 37
 38
 39
 40
 41
 42
 43
 44
 45
 46
 47
 48
 49
 50
 51
 52
 53
 54
 55
 56
 57
 58
 59
 60
 61
 62
 63
 64
 65
 66
 67
 68
 69
 70
 71
 72
 73
 74
 75
 76
 77
 78
 79
 80
 81
 82
 83
 84
 85
 86
 87
 88
 89
 90
 91
 92
 93
 94
 95
 96
 97
 98
 99
100
101
102
103
104
105
106
107
108
109
110
111
112
113
114
115
116
117
118
119
120
121
122
123
124
125
126
127
128
129
130
131
132
133
134
135
136
137
138
139
140
141
142
143
144
145
146
147
148
149
150
151
152
153
154
155
156
157
158
159
160
161
162
163
164
165
166
167
168
169
170
171
172
173
174
175
176
177
178
179
180
181
182
183
184
185
186
187
188
189
190
191
192
193
194
195
196
197
198
199
200
201
202
203
204
205
206
207
208
209
210
211
212
213
214
|
<template>
  <div>
    <!--一个网页是24等份,12占一半,gutter间隔-->
    <el-row :gutter="20">
      <el-col :span="12">
        <div style="width: 100%;height: 100px;background-color: deepskyblue"></div>
      </el-col>
      <el-col :span="12">
        <div style="width: 100%;height: 100px;background-color: palevioletred"></div>
      </el-col>
    </el-row>


    <el-row>
      <el-col :span="3">
<!--        边框-->
        <div style="padding: 10px;border: 1px solid #ccc;text-align: center">
          <img width="80%" src="@/assets/logo.png" >
          <div style="text-align: center">图片名</div>
          <div style="color: red">价格$99</div>
        </div>
      </el-col>
    </el-row>


    <el-row>
      <el-col :span="24">

        <el-button>默认按钮</el-button>
        <el-button type="primary">主要按钮</el-button>
        <el-button type="danger">危险按钮</el-button>
        <el-button type="success">成功按钮</el-button>
        <el-button type="info">信息按钮</el-button>
        <el-button type="warning">警告按钮</el-button>
        <el-button type="primary" plain>朴素主要按钮</el-button>
        <el-button type="primary" round>圆角主要按钮</el-button>
        <el-button type="primary" icon="el-icon-edit" circle></el-button>
        <el-button type="danger" icon="el-icon-delete" circle></el-button>


      </el-col>
    </el-row>

      <el-row style="margin-top: 20px">
      <el-col>
        <el-input style="width:200px " v-model="value" placeholder="请输入内容"></el-input>
        <el-input type="textarea" style="width:200px " v-model="value1"></el-input>
        <el-input show-password style="width:200px " v-model="password" placeholder="请输入密码"></el-input>

        <el-input style="width:200px " v-model="value2" placeholder="请输入内容" prefix-icon="el-icon-search"></el-input>
        <el-input clearable style="width:200px " v-model="value2" placeholder="请输入内容" suffix-icon="el-icon-user" ></el-input>
      </el-col>
    </el-row>


<!--    模糊匹配 建议-->
    <el-row style="margin: 20px 0">
      <el-autocomplete placeholder="请输入内容" :fetch-suggestions="querySearch"
                       :trigger-on-focus="false" v-model="value3"></el-autocomplete>

    </el-row>

      <!--    下拉框-->
    <el-row>
      <el-select v-model="select" @change="changeSelect" multiple>
        <el-option value="香蕉"></el-option>
        <el-option value="苹果"></el-option>
        <el-option value="西瓜"></el-option>
      </el-select>
      <el-select v-model="select1" @change="changeSelect">
        <el-option v-for="item in fruits" :key="item.id" :value="item.name"></el-option>
      </el-select>

<!--      显示输入姓名,实际绑定身份证信息-->
      <el-select v-model="select2" @change="changeSelectUser" filterable>
        <el-option v-for="item in users " :key="item.card" :label="item.label" :value="item.card"></el-option>
      </el-select>

    </el-row>

<!--    单选多选-->
    <el-row>
      <el-radio-group v-model="radio" @change="selectRadio">
        <el-radio label="男"></el-radio>
        <el-radio label="女"></el-radio>
      </el-radio-group>

      <el-checkbox-group v-model="checkList" @change="selectCheckBox">
        <el-checkbox label="复选框 A"></el-checkbox>
        <el-checkbox label="复选框 B"></el-checkbox>
        <el-checkbox label="复选框 C"></el-checkbox>
      </el-checkbox-group>

      <el-date-picker v-model="date" type="date" placeholder="选择日期"
                      value-format="yyyy-MM-dd" @change="changeDate"></el-date-picker>
<!--      2024-08-19 10:28:40-->
      <el-date-picker v-model="datetime" type="datetime" placeholder="选择日期时间"
                      value-format="yyyy-MM-dd HH:mm:ss" @change="changeDateTime"></el-date-picker>
         <el-date-picker v-model="daterange" type="daterange" value-format="yyyy-MM-dd"
                      start-placeholder="开始日期"
                      end-placeholder="结束日期" @change="changeDaterRange">
      </el-date-picker>
    </el-row>

          <el-row style="margin: 100px 0"  >
      <el-table :data="tableDate" border :header-cell-style="{background:'aliceblue',fontSize:'14px'}">
        <el-table-column label="序号" prop="id" align="center"></el-table-column>
        <el-table-column label="姓名" prop="name" align="center"></el-table-column>
        <el-table-column label="年龄" prop="age" align="center"></el-table-column>
        <el-table-column label="地址" prop="address" align="center"></el-table-column>
        <el-table-column label="操作" >
          <template v-slot="scope">
            <el-button type="primary" @click="edit(scope.row)">编辑</el-button>

          </template>
        </el-table-column>
      </el-table>

    </el-row>

  </div>
</template>

<!--响应式数据value-->
<script>
export default {
  name:'Element',
  data(){
    return{
      value:'',
      value1:'',
      password:'',
      value2:'',
      value3:'',
      coffees:[{value:'1瑞幸'},{value:'2星巴克'},{value:'3库迪'}],
      select:'',
      select1:'',
      select2:'',
      fruits:[
        {name:'香蕉',id:1},
        {name:'苹果',id:2},
        {name:'西瓜',id:3}
      ],
      users:[
        {label:'用户1',card:'111111'},
        {label:'用户2',card:'222222'},
        {label:'用户3',card:'333333'}
      ],
      radio:'',
      checkList: [],
      date:'',
      datetime:'',
      daterange:'',
      tableDate:[
        {name:'kong',address:"徐州",id:'1',age:'20'},
        {name:'kong',address:"徐州",id:'1',age:'20'},
        {name:'kong',address:"徐州",id:'1',age:'20'},
      ]
   }
  },
  methods:{
    querySearch(query,cb){ //callback
      console.log(query)
      let result =query ? this.coffees.filter(v => v.value.includes(query)):this.coffees
      console.log(result)
      cb(result)
    },
    changeSelect(){
      console.log(this.select)
    },
    changeSelectUser(){
      console.log(this.select2)

    },
    selectRadio(){
    //  弹出事件
      alert(this.radio)

    },
    selectCheckBox(){
      console.log(this.checkList)

    },
    changeDate(){
      console.log(this.date)
    },
    changeDateTime(){
      console.log(this.datetime)
    },
    changeDaterRange(){
      console.log(this.daterange)
    },
    edit(row){
      // alert(row.name)
      // 弹窗
      this.$message.success(row.name)
      // this.$message.warning(row.name)
      // this.$message.error(row.name)
      this.$notify.warning(row.name)

      this.$confirm('是否确认?','确认提示窗',{
        type:"warning"
      }).then(res =>{
        this.$message.success("ok,点击了确认")
      }).catch(()=>{
        this.$message.warning("ok,点击了取消")
      })

    }

  }
}
</script>
|
- el-col:将网页分为几等分(一个网页是24份)layout布局
- el-button:按钮
- el-input:输入框 el-select:下拉框
- el-radio:单选框 el-checkbox:多选框
- el-table:表格
- http://localhost:7000/element
Vue管理系统
icon:https://www.iconfont.cn/
Container 布局容器:盒子模型 aside+header+main
用于布局的容器组件,方便快速搭建页面的基本结构:
<el-container>:外层容器。当子元素中包含 <el-header> 或 <el-footer> 时,全部子元素会垂直上下排列,否则会水平左右排列。
<el-header>:顶栏容器。
<el-aside>:侧边栏容器。
<el-main>:主要区域容器。
<el-footer>:底栏容器。
 1
 2
 3
 4
 5
 6
 7
 8
 9
10
11
12
13
14
15
16
17
18
19
20
21
22
|
<template>
  <div>
    <!--    外部盒子-->
    <el-container>
      <!--      侧边栏-->
      <el-aside>

      </el-aside>
      <el-container>
        <!--        头部区域-->
        <el-header>

        </el-header>
        <!--        主体区域-->
        <el-main>

        </el-main>
      </el-container>

    </el-container>
  </div>
</template>
|
  1
  2
  3
  4
  5
  6
  7
  8
  9
 10
 11
 12
 13
 14
 15
 16
 17
 18
 19
 20
 21
 22
 23
 24
 25
 26
 27
 28
 29
 30
 31
 32
 33
 34
 35
 36
 37
 38
 39
 40
 41
 42
 43
 44
 45
 46
 47
 48
 49
 50
 51
 52
 53
 54
 55
 56
 57
 58
 59
 60
 61
 62
 63
 64
 65
 66
 67
 68
 69
 70
 71
 72
 73
 74
 75
 76
 77
 78
 79
 80
 81
 82
 83
 84
 85
 86
 87
 88
 89
 90
 91
 92
 93
 94
 95
 96
 97
 98
 99
100
101
102
103
104
105
106
107
108
109
110
111
112
113
114
115
116
117
118
119
120
121
122
123
124
|
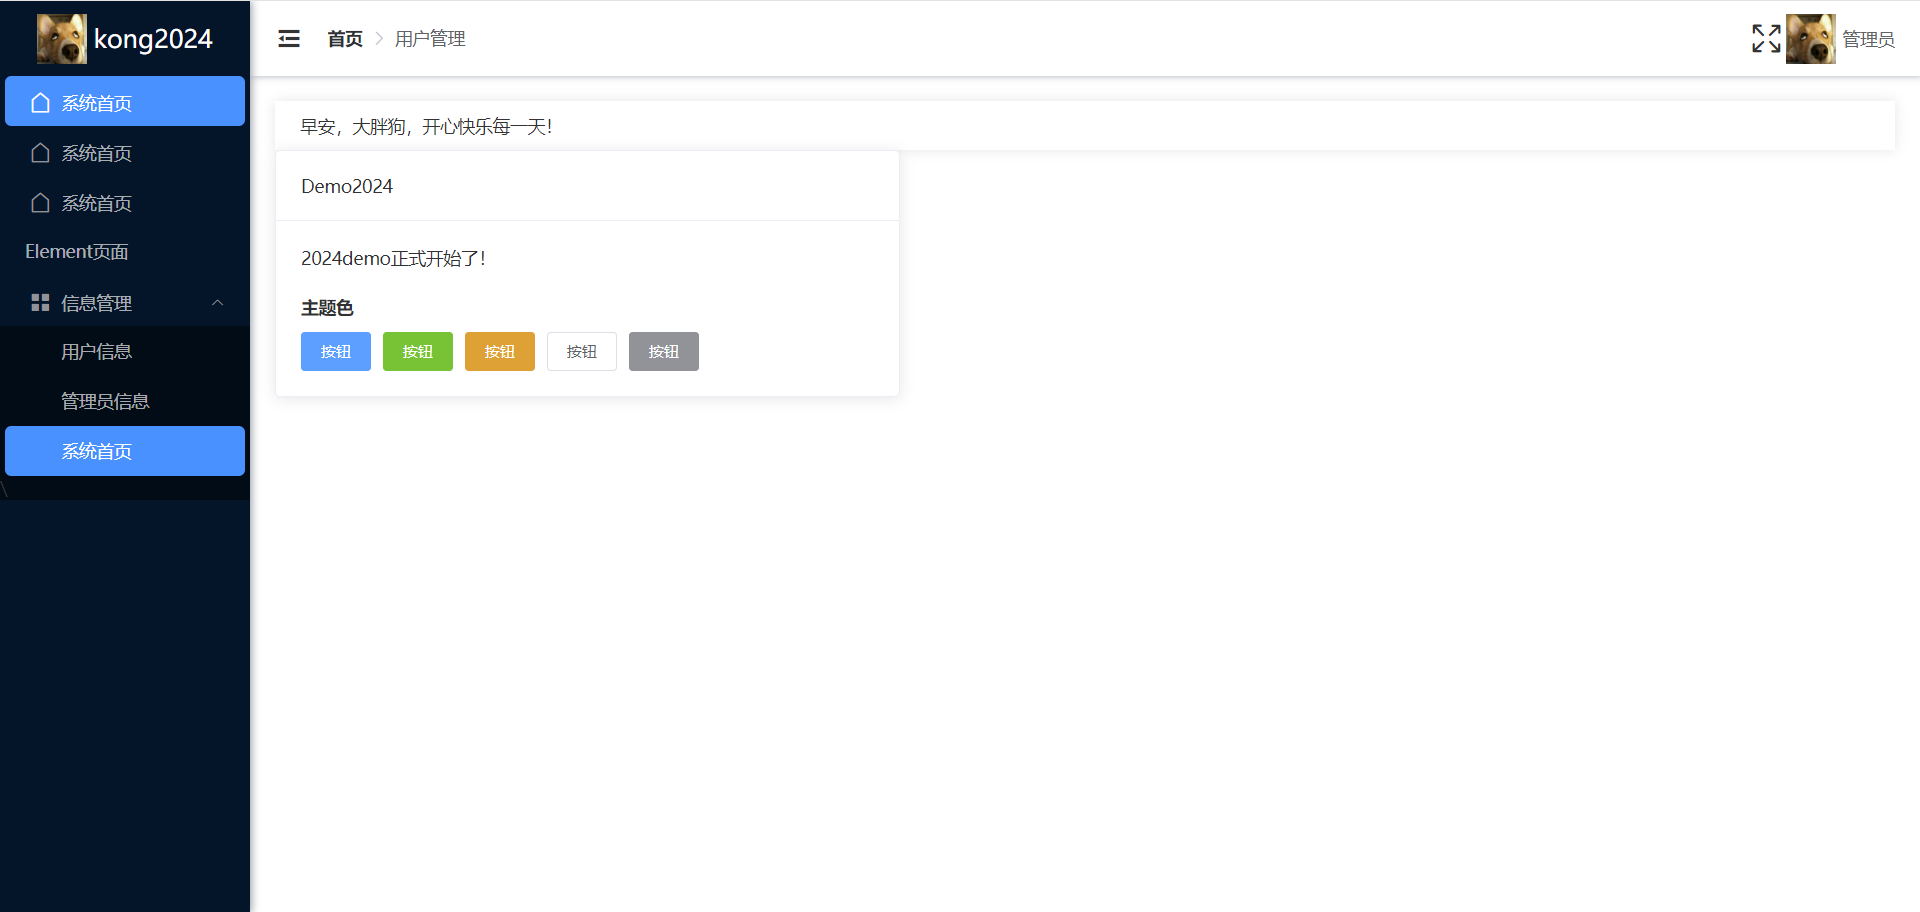
	<el-aside :width="asideWidth" style="min-height: 100vh;background-color: #001529"  >
<!--        logo-->
        <div style="height: 60px;color: white;display: flex;align-items: center;justify-content: center">
          <img src="@/assets/logo1.jpg" style="width: 40px;height: 40px">
          <span  class="logo-tittle" v-show="!isCollapse">kong2024</span>
        </div>

<!--        :绑定属性,绑定当前浏览器的路由,router可点击跳转,:collapse折叠-->
        <el-menu :collapse="isCollapse" :collapse-transition="false" router background-color="#001529" text-color="rgba(255,255,255,0.65)" active-text-color="#fff"
                 style="border: none" :default-active="$route.path">
<!--          当且仅当标签是item时,index路由才会生效-->
          <el-menu-item index="/">
            <i class="el-icon-house"></i>
            <span slot="title">系统首页</span>
          </el-menu-item>
          <el-menu-item index="/1">
            <i class="el-icon-house"></i>
            <span slot="title">系统首页</span>
          </el-menu-item>
          <el-menu-item index="/2">
            <i class="el-icon-house"></i>
            <span slot="title">系统首页</span>
          </el-menu-item>
          <el-menu-item index="/element">Element页面</el-menu-item>
          <el-submenu index="/3">
            <template slot="title">
              <i class="el-icon-menu"></i>
              <span>信息管理</span>
            </template>
            <el-menu-item>用户信息</el-menu-item>
            <el-menu-item>管理员信息</el-menu-item>
            <el-menu-item index="/">系统首页</el-menu-item>\

          </el-submenu>
        </el-menu>

      </el-aside>


<script>
export default {
  name: 'HomeView',
  data(){
    return {
      isCollapse:false ,//不收缩
      asideWidth:'200px',
      collapseIcon:'el-icon-s-fold'//标签样式
    }
  },
  methods:{
    handleCollapse(){
      this.isCollapse=!this.isCollapse
      this.asideWidth=this.isCollapse ? '64px':'200px'
      this.collapseIcon=this.isCollapse ? 'el-icon-s-unfold':'el-icon-s-fold'
    },
    handleFull(){
      document.documentElement.requestFullscreen()
    }
  }
}
</script>
<!--针对对应结构修改样式-->
<style>
.el-menu--inline{
  background-color: #000c17 !important;
}
/*二级菜单的样式,!important强制生效*/
.el-menu--inline .el-menu-item{
  background-color: #000c17 !important;
  padding-left: 49px !important;
}
/*鼠标移动菜单字体高亮*/
.el-menu-item:hover,.el-submenu__title:hover{
  color: #fff !important;
}
/*一级菜单对应的图标 高亮*/
.el-submenu__title:hover i{
  color: #fff !important;
}
/*菜单背景 高亮*/
.el-menu-item.is-active{
  background-color: #1890ff !important;
  border-radius: 5px !important;
  width: calc(100% - 8px);
  margin-left: 4px;
}
.el-menu-item.is-active i,.el-menu-item.is-active .el-tooltip{
  margin-left: -4px;
}
.el-menu-item{
  height: 40px !important;
  line-height: 40px !important;
}
.el-submenu__title{
  height: 40px !important;
  line-height: 40px !important;
}
.el-submenu__icon-arrow{
  margin-top: -5px;
}
.el-submenu .el-menu-item{
  min-width: 0!important;
}
.el-menu--inline .el-menu-item.is-active{
  padding-left: 45px!important;
}
/*收缩动画时间*/
.el-aside{
  transition: width .3s;
  /*阴影*/
  box-shadow:2px 0 6px rgba(0,21,41,.35);
}
.logo-tittle{
  margin-left: 5px;font-size: 20px;
  transition: all .3s;
}
.el-header{
  /*阴影*/
  box-shadow:2px 0 6px rgba(0,21,41,.35);
  display: flex;
  align-items: center;

}
</style>
|
 1
 2
 3
 4
 5
 6
 7
 8
 9
10
11
12
13
14
15
16
17
18
19
20
21
22
23
24
25
26
|
<el-header>
          <i :class="collapseIcon" style="font-size: 22px " @click="handleCollapse"></i>
<!--          面包屑,显示当前页面的路径,快速返回之前的任意页面。-->
          <el-breadcrumb separator-class="el-icon-arrow-right" style="margin-left: 20px">
            <el-breadcrumb-item :to="{ path: '/' }">首页</el-breadcrumb-item>
            <el-breadcrumb-item :to="{ path: '/user' }">用户管理</el-breadcrumb-item>
          </el-breadcrumb>

          <div style="flex:1;width:0;display:flex;align-items:center; justify-content: end">
<!--            全屏-->
            <i class="el-icon-quanping" style="font-size: 22px" @click="handleFull"></i>
            <el-dropdown placement="bottom">
              <div style="display: flex;align-items: center;cursor:default ">
                <img src="@/assets/logo1.jpg" style="width: 40px; height: 40px;margin: 0 5px">
                <span>管理员</span>
              </div>
              <el-dropdown-menu slot="dropdown">
                <el-dropdown-item>个人信息</el-dropdown-item>
                <el-dropdown-item>修改密码</el-dropdown-item>
                <el-dropdown-item @click="">退出登录</el-dropdown-item>
                </el-dropdown-menu>
            </el-dropdown>

          </div>

        </el-header>
|
 1
 2
 3
 4
 5
 6
 7
 8
 9
10
11
12
13
14
15
16
17
18
19
20
21
22
23
24
|
<el-main>
          <div style="box-shadow:0 0 10px rgba(0,0,0,.1);padding:10px 20px;border-radius: inherit;">
              早安,大胖狗,开心快乐每一天!
          </div>

          <el-card style="width:500px">
            <div slot="header"class="clearfix">
              <span>Demo2024</span>
            </div>
            <div>
              2024demo正式开始了!
              <div style="margin-top:20px">
                <div style="margin:10px 0"><strong>主题色</strong></div>
                <el-button type="primary">按钮</el-button>
                <el-button type="success">按钮</el-button>
                <el-button type="warning">按钮</el-button>
                <el-button type:="danger">按钮</el-button>
                <el-button type="info">按钮</el-button>
              </div>
            </div>
          </el-card>


        </el-main>
|
springboot
识别并停止占用端口的进程 Windows 系统
- 打开命令提示符(管理员):在搜索栏输入
cmd,右键点击“命令提示符”并选择“以管理员身份运行”。
- 查找占用端口的进程:输入以下命令并按回车,
netstat -aon | findstr :8080。这将列出所有在端口8080上监听的进程及其PID(进程ID)。
- 结束进程:使用
taskkill /F /PID <PID号>命令来结束该进程。将<PID号>替换为你从上一步中获得的PID号。
打断点会出现对应信息,本地开发使用debug启动,方便调试
springboot2.x JDK1.8 java8
依赖:lombok、springweb、mysqldriver、mybatis
项目配置:
设置maven路径和仓库,pom.xml右键 addasmavenproject自动下载
删除文件 .mvm、gitgnore、help、mvnw、mvnw.cmd多余文件
配置编码:搜enc 全设置为utf-8 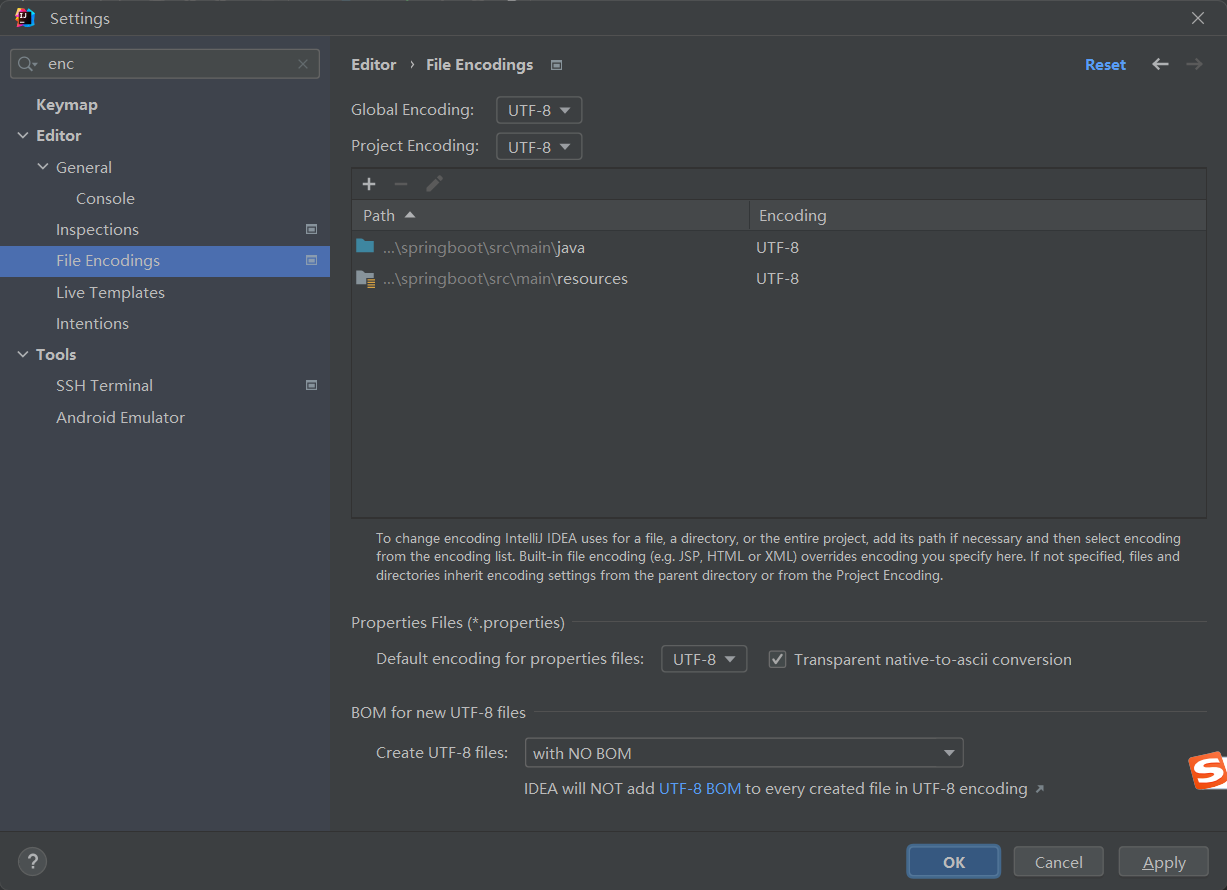
修改配置文件application.properties修改为yml文件
统一返回result对象
common-result
 1
 2
 3
 4
 5
 6
 7
 8
 9
10
11
12
13
14
15
16
17
18
19
20
21
22
23
24
25
26
27
28
29
30
31
32
33
34
35
36
37
38
39
40
41
42
43
44
45
46
47
48
49
50
51
52
53
54
55
56
57
58
59
60
61
62
63
|
package com.example.springboot.common;

import lombok.AllArgsConstructor;
import lombok.Builder;
import lombok.Data;
import lombok.NoArgsConstructor;

import java.util.Objects;

/**
 * ClassName: result
 * Package: com.example.springboot.common
 * Description:
 *
 * @Author kong
 * @Create 2024/8/20 14:36
 * @Version 1.0
 */
@Data //get set 方法
@AllArgsConstructor//全参构造
@NoArgsConstructor//无参构造
@Builder//构建者模式
public class Result {

    public static final String CODE_SUCCESS = "200";
    public static final String CODE_AUTH_ERROR ="401";
    public static final String CODE_SYS_ERROR ="500";

    /**
     * 请求返回编码 200 401 404 500
     */
    private String code;
    /**
     * 错误信息
     */
    private String msg;
    /**
     * 返回数据
     */
    private Object data;


    public static Result success(){
//        return new Result(CODE_SUCCESS,"请求成功",null);
        return Result.builder().code(CODE_SUCCESS).msg("请求成功").build();
    }

    public static Result success(Object data){
        return new Result(CODE_SUCCESS,"请求成功",data);
    }

    public static Result error(String msg){
        return new Result(CODE_SYS_ERROR,msg,null);
    }

    public static Result error(String code,String msg){
        return new Result(code,msg,null);
    }
    public static Result error(){
        return new Result(CODE_SYS_ERROR,"系统错误",null);
    }
}
|
 1
 2
 3
 4
 5
 6
 7
 8
 9
10
11
12
13
14
15
16
|
@RestController
public class WebController {
// 默认为/
@RequestMapping()
public Result hello( String name){
return Result.success(name);
}
}
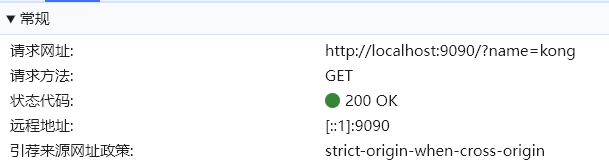
http://localhost:9090/?name=kong
{
"code": "200",
"msg": "请求成功",
"data": "kong"
}
|
@Builder 链式的方法 创建user对象 并可设置属性
 1
 2
 3
 4
 5
 6
 7
 8
 9
10
|
@Builder
public class User {
	private String name;

    public static void main(String[] args) {
//        alt_enter快捷创建变量
        User user = User.builder().name("kkk").build();
        System.out.println(user.getName());
    }
}
|
HTTP
postman
f12 网络-fetch-可以看到后台接口数据
- 常规 请求格式
- 响应头:content-type:application/json
- 请求头
接口类型
- get 查询
- @RequestMapping()
@RequestMapping(method = RequestMethod.GET)
@GetMapping("/hello")
- post 新增
- delete 删除
- @DeleteMapping("/delete/{id}")
public Result delete(@PathVariable Integer id){
return Result.success(id);
}
- put 更新
http状态码
- 200:请求成功
- 405:请求接口类型错误
- 400:接口参数错误-参数传输的类型错误,需要json,传了url参数
- 404:接口路径错误或参数错误
- 500:后台错误,看后台控制台-报错信息
post
url参数,且url参数可为空
 1
 2
 3
 4
 5
 6
 7
 8
 9
10
11
12
13
14
15
16
17
18
19
20
21
22
23
24
25
26
27
28
29
30
|
@RestController
@RequestMapping("/web")
public class WebController {

    @PostMapping("/post")//  /web/post
    public Result post(Obj obj){
        return Result.success(obj);
    }
}

public class Obj {
    private String name;
}

localhost:9090/web/post
{
    "code": "200",
    "msg": "请求成功",
    "data": {
        "name": null
    }
}
localhost:9090/web/post?name=kkk
{
    "code": "200",
    "msg": "请求成功",
    "data": {
        "name": "kkk"
    }
}
|
@RequestBody:将前端提交的json变为java对象
postman中选择body raw json 用于传输json,也可为空json
 1
 2
 3
 4
 5
 6
 7
 8
 9
10
11
12
13
14
15
16
17
18
19
20
21
22
23
24
|
@PostMapping("/post")//  /web/post
public Result post(@RequestBody Obj obj){
    return Result.success(obj);
}

localhost:9090/web/post?name=kkk
{
    "timestamp": "2024-08-21T01:45:06.344+00:00",
    "status": 400,
    "error": "Bad Request",
    "path": "/web/post"
}
//参数传输的类型错误,需要json,传了url参数
body raw json
{
    "name":"kkk"
}
{
    "code": "200",
    "msg": "请求成功",
    "data": {
        "name": "kkk"
    }
}
|
delete
可以传输url id,也可以传json–可用于批量删除
 1
 2
 3
 4
 5
 6
 7
 8
 9
10
11
12
13
14
15
16
17
18
19
20
21
22
23
24
25
26
27
28
29
30
31
32
33
34
35
36
37
38
39
40
41
42
43
44
|
@DeleteMapping("/delete/{id}")
public Result delete(@PathVariable Integer id){
    return Result.success(id);
}

localhost:9090/web/delete/1
{
    "code": "200",
    "msg": "请求成功",
    "data": 1
}

@DeleteMapping("/delete")//
    public Result delete(@RequestBody Obj obj){
        return Result.success(obj);
    }
localhost:9090/web/delete
{
    "name":"kkk"
}
{
    "code": "200",
    "msg": "请求成功",
    "data": {
        "name": "kkk"
    }
}

@DeleteMapping("/delete")//
    public Result delete(@RequestBody List<Integer> ids){
        return Result.success(ids);
    }
[1,2,3,4,5]
{
    "code": "200",
    "msg": "请求成功",
    "data": [
        1,
        2,
        3,
        4,
        5
    ]
}
|
mybatis
数据库test2024
id 主键 自增 右键设计表添加索引保证username唯一性

 1
 2
 3
 4
 5
 6
 7
 8
 9
10
11
12
|
CREATE TABLE `user` (
  `id` int(11) NOT NULL AUTO_INCREMENT,
  `username` varchar(255) CHARACTER SET utf8mb4 COLLATE utf8mb4_unicode_ci DEFAULT NULL COMMENT '用户名',
  `password` varchar(255) CHARACTER SET utf8mb4 COLLATE utf8mb4_unicode_ci DEFAULT NULL COMMENT '密码',
  `name` varchar(255) CHARACTER SET utf8mb4 COLLATE utf8mb4_unicode_ci DEFAULT NULL COMMENT '姓名',
  `phone` varchar(255) CHARACTER SET utf8mb4 COLLATE utf8mb4_unicode_ci DEFAULT NULL COMMENT '电话',
  `email` varchar(255) CHARACTER SET utf8mb4 COLLATE utf8mb4_unicode_ci DEFAULT NULL COMMENT '邮箱',
  `address` varchar(255) CHARACTER SET utf8mb4 COLLATE utf8mb4_unicode_ci DEFAULT NULL COMMENT '地址',
  `avatar` varchar(255) CHARACTER SET utf8mb4 COLLATE utf8mb4_unicode_ci DEFAULT NULL COMMENT '头像',
  PRIMARY KEY (`id`),
  UNIQUE KEY `username` (`username`) USING BTREE
) ENGINE=InnoDB AUTO_INCREMENT=8 DEFAULT CHARSET=utf8mb4 COLLATE=utf8mb4_unicode_ci COMMENT='用户表';
|
application.yml
 1
 2
 3
 4
 5
 6
 7
 8
 9
10
|
server:
  port: 9090

# mysql
spring:
  datasource:
    driver-class-name: com.mysql.cj.jdbc.Driver
    url: jdbc:mysql://localhost:3306/test2024?useSSL=false&useUnicode=true&characterEncoding=UTF-8&serverTimezone=GMT%2b8
    username: root
    password: 123456
|
entity-user
编译之后,maven-springboot-lifecycle-compile
可以在target/classes/com/example/springboot/entity中看到getset方法已经有了
 1
 2
 3
 4
 5
 6
 7
 8
 9
10
11
|
@Data
public class User {
    private Integer id;
    private String username;
    private String passward;
    private String name;
    private String phone;
    private String email;
    private String address;
    private String avatar;
}
|
usercontroller:与前端进行交互,前端调用controller接口,并需要拿数据库信息,即注入service
service:通过mapper操作数据库
mapper:存放mybatis接口/dto
前端数据流程:user->controller->service->mapper->sql
新增post-insert
usermapper
1
2
3
4
5
6
7
8
|
@Mapper//注入spring容器
public interface UserMapper {

    //通过数据库语句插入
    @Insert("insert into `user` (username,password,name,phone,email,address,avatar) values " +
            "(#{username},#{password},#{name},#{phone},#{email},#{address},#{avatar})")
    void insert(User user);
}
|
userservice
 1
 2
 3
 4
 5
 6
 7
 8
 9
10
|
@Service
public class UserService {

    @Autowired
    UserMapper userMapper;
    public void insertUser(User user){
        userMapper.insert(user);

    }
}
|
usercontroller
 1
 2
 3
 4
 5
 6
 7
 8
 9
10
11
12
13
14
15
16
17
18
19
20
21
22
23
24
25
26
27
28
29
30
31
32
33
34
35
36
37
38
39
40
41
42
43
44
45
46
47
48
49
|
@RestController
@RequestMapping("/user")
public class UserController {

//    从spring容器中拿到bean
    @Autowired
    UserService userService;

//    新增用户信息
    @PostMapping("/add")
    public Result add(@RequestBody User user){
        //userService.insertUser(user);
        try {
            userService.insertUser(user);
        }catch (Exception e){
            if (e instanceof DuplicateKeyException){
                return Result.error("插入数据库错误");
            }else {
                return Result.error("系统错误");
            }
        }
        return Result.success();
    }
}
//数据重复插入会报错500,java.sql.SQLIntegrityConstraintViolationException: Duplicate entry 'kong' for key 'username'
{
    "username":"kong",
    "password":"123",
    "name": "kong"
}
{
    "code": "500",
    "msg": "插入数据库错误",
    "data": null
}
{
    "username":"kong1",
    "password":"123",
    "name": "kong1",
    "phone":"123456",
    "email":"k@123.com",
    "address":"江苏徐州",
    "avatar":"123.jpg"
}
{
    "code": "200",
    "msg": "请求成功",
    "data": null
}
|
更新 put-updata
usermapper
1
2
3
|
@Update("update `user` set username = #{username},password = #{password},name = #{name},phone = #{phone},email = #{email},address = #{address},avatar = #{avatar}" +
        "where id=#{id}")
void updateUser(User user);
|
userservice
1
2
3
|
public void updateUser(User user){
    userMapper.updateUser(user);
}
|
usercontroller
1
2
3
4
5
6
|
//    修改用户信息
    @PutMapping("update")
    public Result update(@RequestBody User user){
        userService.updateUser(user);
        return Result.success();
    }
|
 1
 2
 3
 4
 5
 6
 7
 8
 9
10
11
12
13
14
15
16
17
|
localhost:9090/user/update

{
    "id":"7",
    "username":"kong1",
    "password":"123",
    "name": "kong1",
    "phone":"123456",
    "email":"k@123.com",
    "address":"江苏徐州",
    "avatar":"123456.jpg"
}
{
    "code": "200",
    "msg": "请求成功",
    "data": null
}
|
删除 delete
单个删除
usermapper
1
2
|
@Delete("delete from `user` where id=#{id}")
void deleteUser(Integer id);
|
userservice
1
2
3
|
public void deleteUser(Integer id){
    userMapper.deleteUser(id);
}
|
usercontroller
1
2
3
4
5
|
@DeleteMapping("delete/{id}")
public Result delete(@PathVariable Integer id){
    userService.deleteUser(id);
    return Result.success();
}
|
批量删除-传入数组,循环删除
userservice
1
2
3
4
5
|
public void batchDeleteUser(List<Integer> ids) {
    for (Integer id : ids) {
        userMapper.deleteUser(id);
    }
}
|
usercontroller
1
2
3
4
5
6
|
//    批量删除
@DeleteMapping("delete/batch")
public Result batchDelete(@RequestBody List<Integer> ids) {
    userService.batchDeleteUser(ids);
    return Result.success();
}
|
1
2
3
4
5
6
|
[9,10]
{
    "code": "200",
    "msg": "请求成功",
    "data": null
}
|
查询:get-select
排序查询
倒序 最新插入数据在最前面
usermapper
1
2
|
@Select("select * from `user` order by id desc ")
List<User> selectAll();
|
userservice
1
2
3
|
public List<User> selectAll() {
   return userMapper.selectAll();
}
|
usercontroller
1
2
3
4
5
6
|
//    查询全部用户信息
@GetMapping("/selectAll")
public Result selectAll() {
    List<User> userList = userService.selectAll();
    return Result.success(userList);
}
|
 1
 2
 3
 4
 5
 6
 7
 8
 9
10
11
12
13
14
15
16
17
18
19
20
21
22
23
24
25
26
27
28
29
30
31
32
33
34
35
36
37
38
39
40
41
42
43
44
45
46
47
48
49
50
51
52
53
54
55
56
57
58
59
60
61
62
63
64
65
66
67
68
|
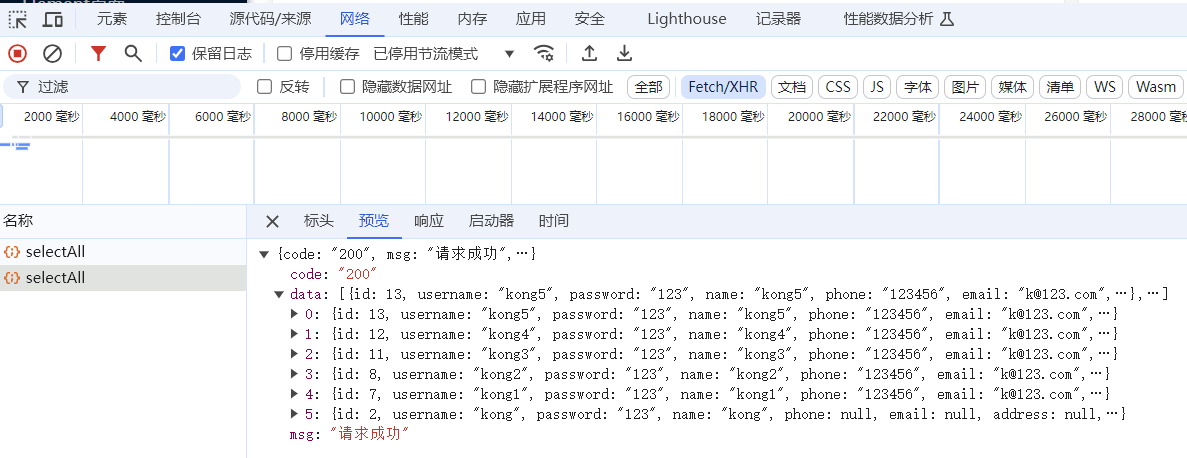
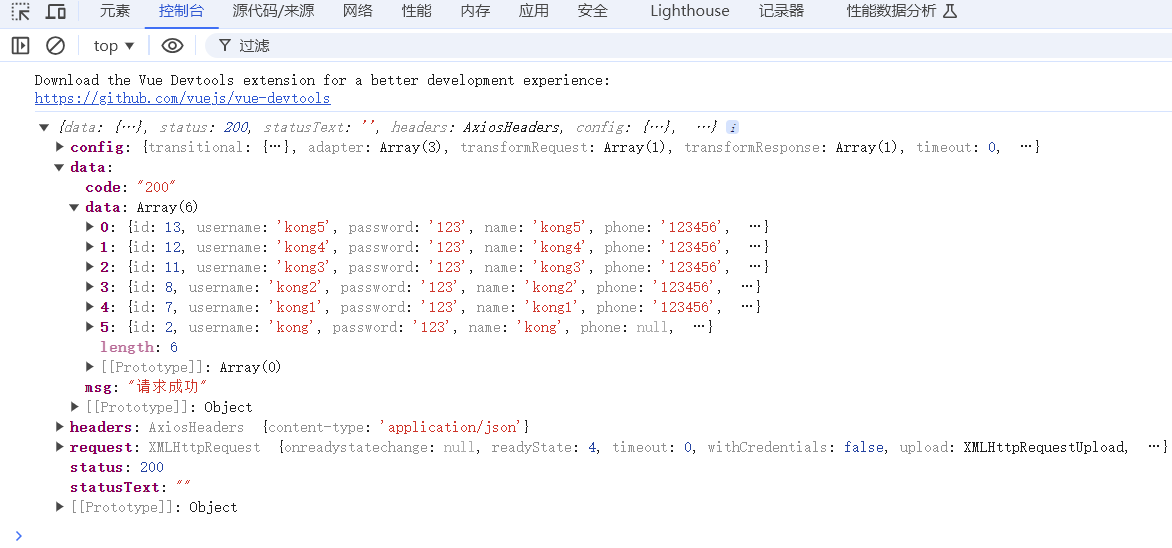
localhost:9090/user/selectAll

{
    "code": "200",
    "msg": "请求成功",
    "data": [
        {
            "id": 2,
            "username": "kong",
            "password": "123",
            "name": "kong",
            "phone": null,
            "email": null,
            "address": null,
            "avatar": null
        },
        {
            "id": 7,
            "username": "kong1",
            "password": "123",
            "name": "kong1",
            "phone": "123456",
            "email": "k@123.com",
            "address": "江苏徐州",
            "avatar": "123456.jpg"
        },
        {
            "id": 8,
            "username": "kong2",
            "password": "123",
            "name": "kong2",
            "phone": "123456",
            "email": "k@123.com",
            "address": "江苏徐州",
            "avatar": "123456.jpg"
        },
        {
            "id": 11,
            "username": "kong3",
            "password": "123",
            "name": "kong3",
            "phone": "123456",
            "email": "k@123.com",
            "address": "江苏徐州",
            "avatar": "123.jpg"
        },
        {
            "id": 12,
            "username": "kong4",
            "password": "123",
            "name": "kong4",
            "phone": "123456",
            "email": "k@123.com",
            "address": "江苏徐州",
            "avatar": "123.jpg"
        },
        {
            "id": 13,
            "username": "kong5",
            "password": "123",
            "name": "kong5",
            "phone": "123456",
            "email": "k@123.com",
            "address": "江苏徐州",
            "avatar": "123.jpg"
        }
    ]
}
|
条件查询
通过id查询
若通过name查询,会报错500,因为查询结果为多个,需要返回多个对象,但是返回类型为user对象,则会报错。应该修改为List < User>类型。如果不确定查询结果有几个,则可以统一使用list
 1
 2
 3
 4
 5
 6
 7
 8
 9
10
11
12
13
14
15
16
17
18
19
20
21
22
23
24
25
26
27
28
29
30
31
32
|
    @Select("select * from `user` where id =#{id} order by id desc")
    User selectById(Integer id);

    public User selectById(Integer id){
        return userMapper.selectById(id);
    }

    /**
     * 查询单个用户信息
     * @return
     */
    @GetMapping("/selectById/{id}")
    public Result selectAll(@PathVariable Integer id) {
        User user = userService.selectById(id);
        return Result.success(user);
    }

localhost:9090/user/selectById/13
{
    "code": "200",
    "msg": "请求成功",
    "data": {
        "id": 13,
        "username": "kong5",
        "password": "123",
        "name": "kong5",
        "phone": "123456",
        "email": "k@123.com",
        "address": "江苏徐州",
        "avatar": "123.jpg"
    }
}
|
多条件查询
1
2
|
@Select("select * from `user` where username =#{username} and name =#{name} order by id desc")
User selectByMore(@Param("username") String username,@Param("name") String name);
|
多条件全模糊查询-不确定查询结果有几个用list
 1
 2
 3
 4
 5
 6
 7
 8
 9
10
11
12
13
14
15
16
17
18
19
20
21
22
23
24
25
26
27
28
29
30
31
32
33
34
35
36
37
38
39
40
41
42
43
44
45
46
47
48
49
50
|
    @Select("select * from `user` where username like  concat('%',#{username},'%') and name like concat('%',#{name},'%') order by id desc")
    List<User> selectByFuzzy(@Param("username") String username,@Param("name") String name);

    public List<User> selectByFuzzy(String username, String name) {
        return userMapper.selectByFuzzy(username,name);
    }

    /**
     * 多条件模糊查询用户信息
     * @return
     */
    @GetMapping("/selectByFuzzy")
    public Result selectByFuzzy(@RequestParam String username,@RequestParam String name) {
        List<User> userList = userService.selectByFuzzy(username,name);
        return Result.success(userList);
    }

localhost:9090/user/selectByFuzzy?username=kong&name=kong
{
    "code": "200",
    "msg": "请求成功",
    "data": [
        {
            "id": 13,
            "username": "kong5",
            "password": "123",
            "name": "kong5",

        },
        {
            "id": 12,
            "username": "kong4",
            "password": "123",
            "name": "kong4",

        },
        {
            "id": 11,
        },
        {
            "id": 8,
        },
        {
            "id": 7,
        },
        {
            "id": 2,
        }
    ]
}
|
多条件分页模糊查询
1
2
3
4
5
6
7
|
LIMIT [位置偏移量], 行数
# 位置偏移量:可选参数,位置偏移量,不写默认是0,代表不偏移;
# 行数:指示返回的记录条数。

# 分页显示公式:(当前页数-1)*每页条数,每页条数
SELECT * FROM table
LIMIT (PageNo - 1)*PageSize,PageSize
|
 1
 2
 3
 4
 5
 6
 7
 8
 9
10
11
12
13
14
15
16
17
18
19
20
21
22
23
24
25
26
27
28
29
30
31
32
33
34
35
36
37
38
39
40
41
42
43
44
45
46
47
48
49
50
51
52
53
54
55
56
57
58
59
|
    @Select("select * from `user` where username like  concat('%',#{username},'%') and name like concat('%',#{name},'%') " +
            "order by id desc limit #{pageNum},#{pageSize}")
    List<User> selectByPage(@Param("username") String username,@Param("name") String name
            ,@Param("pageNum") Integer pageNum,@Param("pageSize") Integer pageSize);

	//总的数据量
    @Select("select count(id) from `user` where username like  concat('%',#{username},'%') and name like concat('%',#{name},'%') " +
            "order by id desc ")
    Integer selectCountByPage(@Param("username") String username,@Param("name") String name);


    public Map<String,Object> selectByPage(String username, String name, Integer pageNum, Integer pageSize) {

        pageNum =(pageNum-1)*pageSize;

        Map<String,Object> result =new HashMap<>();
        List<User> userList =userMapper.selectByPage(username,name,pageNum,pageSize);
        Integer total =userMapper.selectCountByPage(username,name);
        result.put("list",userList);
        result.put("total",total);
        return result;
    }

 /**
     * 多条件模糊分页查询用户信息
     * @return
     */
    @GetMapping("/selectByPage")
    public Result selectByPage(@RequestParam String username,@RequestParam String name,
                               @RequestParam Integer pageNum,@RequestParam Integer pageSize) {
        Map<String, Object> pageMap = userService.selectByPage(username, name, pageNum, pageSize);
        return Result.success(pageMap);
    }

localhost:9090/user/selectByPage?username=kong&name=kong&pageNum=1&pageSize=5
{
    "code": "200",
    "msg": "请求成功",
    "data": {
        "total": 6,
        "list": [
            {
                "id": 13,
            },
            {
                "id": 12,
            },
            {
                "id": 11,
            },
            {
                "id": 8,
            },
            {
                "id": 7,
            }
        ]
    }
}
|
hashmap
后面controller返回的数据还是实体类对象 result对象类型, Spring Boot会利用配置的消息转换器(Message Converters)来将这些对象转换成JSON格式的字符串,然后发送给客户端。默认情况下,Spring Boot会使用Jackson库来执行这种转换。通过**@RestController**注解实现。
同时controller接收前端数据的时候会通过@RequestBody User user将前端json转为实体类user
 1
 2
 3
 4
 5
 6
 7
 8
 9
10
11
12
13
14
15
16
17
18
|
public static void main(String[] args) {
    Map<String,Object> result =new HashMap<>();
    result.put("name","kong");
    result.put("total",1);
    System.out.println(result);
    System.out.println(result.getClass().getName());
    Result data = Result.success(result);
    System.out.println(data+"  "+data.getClass().getName());

    System.out.println(data.getData()+"  "+data.getData().getClass().getName());

}

{total=1, name=kong}
java.util.HashMap
Result(code=200, msg=请求成功, data={total=1, name=kong})  com.example.springboot.common.Result
{total=1, name=kong}  java.util.HashMap
|
进一步封装page对象,作为分页查询的返回对象
 1
 2
 3
 4
 5
 6
 7
 8
 9
10
11
12
13
14
15
16
17
18
19
20
21
22
23
24
25
26
27
28
29
30
31
32
33
34
35
36
37
38
39
40
41
42
43
44
45
46
|
@Data
public class page<T> {
    //    总数据量
    private Integer total;
    //    每页的数据
    private List<T> list;

}

    public Page<User> selectByPage(String username, String name, Integer pageNum, Integer pageSize) {

        pageNum = (pageNum - 1) * pageSize;
        Page<User> page = new Page<>();
        List<User> userList = userMapper.selectByPage(username, name, pageNum, pageSize);
        Integer total = userMapper.selectCountByPage(username, name);
        page.setList(userList);
        page.setTotal(total);
        return page;
    }

    @GetMapping("/selectByPage")
    public Result selectByPage(@RequestParam String username,@RequestParam String name,
                               @RequestParam Integer pageNum,@RequestParam Integer pageSize) {
        Page<User>page = userService.selectByPage(username, name, pageNum, pageSize);
        return Result.success(page);
    }

localhost:9090/user/selectByPage?username=kong&name=kong&pageNum=1&pageSize=3
{
    "code": "200",
    "msg": "请求成功",
    "data": {
        "total": 6,
        "list": [
            {
                "id": 13,
            },
            {
                "id": 12,
            },
            {
                "id": 11,
            }
        ]
    }
}
|
前后端交互
axios
安装:
npm i axios -S
 1
 2
 3
 4
 5
 6
 7
 8
 9
10
11
12
13
14
15
16
17
18
19
20
21
22
23
24
25
26
27
28
29
30
31
32
33
34
|
		<el-card style="width:50%">
              <div slot="header"class="clearfix">
                <span>渲染用户数据</span>
              </div>
              <div>
                <el-table :data="users">
                  <el-table-column label="ID" prop="id"></el-table-column>
                  <el-table-column label="用户名" prop="username"></el-table-column>
                  <el-table-column label="姓名" prop="name"></el-table-column>
                  <el-table-column label="地址" prop="address"></el-table-column>
                </el-table>
              </div>

         </el-card>

import axios from "axios";

export default {
  name: 'HomeView',
  data(){
    return {
      users: []
    }
  },
  //页面加载好再去请求数据,页面加载完后触发
  mounted() {
    axios.get('http://localhost:9090/user/selectAll').then(res =>{
      console.log(res.data)//后台返回的数据
	  this.users =res.data.data

    })
  }
}
|
ERROR
Network Error AxiosError: Network Error at XMLHttpRequest.handleError (webpack-internal:///./node_modules/axios/lib/adapters/xhr.js:112:14) at Axios.request (webpack-internal:///./node_modules/axios/lib/core/Axios.js:54:41)

跨域问题:
在controller层添加注解@CrossOrigin
封装请求工具类
request.js
 1
 2
 3
 4
 5
 6
 7
 8
 9
10
11
12
13
14
15
16
17
18
19
20
21
22
23
24
25
26
27
28
29
30
31
32
33
34
35
36
|
//前端封装好的http工具
import axios from "axios";

//创建一个新的axios对象
const request =axios.create({
    baseURL:'http://localhost:9090',
    timeout:30000
})

//定义请求参数 request拦截器 可以自请求发送前对请求做一些处理,比如统一加token,对请求参数统一加密
request.interceptors.request.use(config =>{
    config.headers['Content-Type']='application/json;charset=utf-8';
    //设置请求头
    // config.headers['token']
    return config
},error => {
    console.error('request error: '+error)
    return Promise.reject(error)
})

//响应标头 response拦截器 可以在接口响应后统一处理结果
request.interceptors.response.use(
    response=>{
        let res=response.data;
        //兼容服务器端返回的字符串数据
        if(typeof res==='string'){
            res=res ? JSON.parse(res) : res
        }
        return res;
    },
    error => {
        console.error('response error: '+error)
        return Promise.reject(error)
    }
)
export default request
|
 1
 2
 3
 4
 5
 6
 7
 8
 9
10
11
12
13
14
15
16
17
|
import Request from "@/utils/request";

export default {
  name: 'HomeView',
  data(){
    return {
      users: []
    }
  },
  //页面加载好再去请求数据,页面加载完后触发
  mounted() {

    Request.get('/user/selectAll').then(res=>{
      this.users=res.data
    })
  }
}
|
vue登录注册
router-index.js写入路由
1
2
3
|
{
  path: '/login',name:'Login',component: () => import('../views/Login.vue')
}
|
main.js 定义全局变量
1
2
3
|
import request from "@/utils/request";
//定义全局的变量request
Vue.prototype.$request=request
|
登录界面
login.vue
  1
  2
  3
  4
  5
  6
  7
  8
  9
 10
 11
 12
 13
 14
 15
 16
 17
 18
 19
 20
 21
 22
 23
 24
 25
 26
 27
 28
 29
 30
 31
 32
 33
 34
 35
 36
 37
 38
 39
 40
 41
 42
 43
 44
 45
 46
 47
 48
 49
 50
 51
 52
 53
 54
 55
 56
 57
 58
 59
 60
 61
 62
 63
 64
 65
 66
 67
 68
 69
 70
 71
 72
 73
 74
 75
 76
 77
 78
 79
 80
 81
 82
 83
 84
 85
 86
 87
 88
 89
 90
 91
 92
 93
 94
 95
 96
 97
 98
 99
100
101
102
103
104
105
106
107
108
109
110
111
112
113
114
115
116
117
118
119
120
121
122
123
124
125
126
127
128
129
|
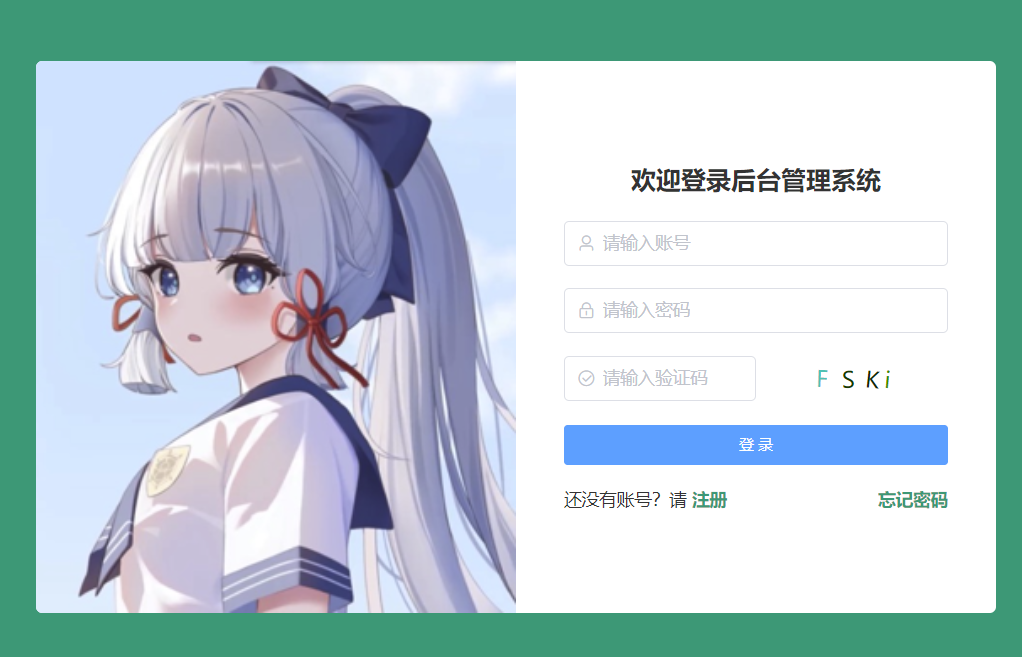
<template>
<div style="height: 100vh; display: flex;align-items: center;justify-content: center;background-color: #0f9876">
<div style="display: flex; background-color: white;width: 50%;border-radius: 5px;overflow: hidden">
<div style="flex: 1;">
<img src="@/assets/shenli.png" style="width: 100%;height: 100%">
</div>
<div style="flex: 1;display: flex;align-items: center;justify-content: center">
<!-- 绑定user对象-->
<el-form :model="user" style="width: 80%" :rules="rules" ref="loginRef">
<div style="font-size: 20px; font-weight: bold;text-align: center;margin-bottom: 20px">欢迎登录后台管理系统</div>
<!-- 表单 prop表单校验-->
<el-form-item prop="username">
<el-input prefix-icon="el-icon-user" size="medium" placeholder="请输入账号" v-model="user.username"></el-input>
</el-form-item>
<el-form-item prop="password">
<el-input prefix-icon="el-icon-lock" size="medium" show-password placeholder="请输入密码" v-model="user.password"></el-input>
</el-form-item>
<!-- 验证码-->
<el-form-item prop="code">
<div style="display: flex">
<el-input prefix-icon="el-icon-circle-check" size="medium" placeholder="请输入验证码" style="flex: 1" v-model="user.code"></el-input>
<div style="flex: 1;height: 36px" >
<valid-code @update:value="getCode"/>
</div>
</div>
</el-form-item>
<el-form-item>
<el-button type="primary" style="width: 100%" @click="login">登 录</el-button>
</el-form-item>
<div style="display: flex">
<!-- 登录 指到变成小手-->
<div style="flex: 1">还没有账号?请 <span style="color: #0f9876;cursor: pointer">注册</span></div>
<div style="flex: 1;text-align: right"><span style="color: #0f9876;cursor: pointer">忘记密码</span></div>
</div>
</el-form>
</div>
</div>
</div>
</template>
<script>
import ValidCode from "@/conponents/ValidCode";
export default {
name: "Login",
//引入验证码组件
components: {
ValidCode
},
data() {
//自定义 验证码校验
const validateCode = (rule, value, callback) => {
if (value === '') {
callback(new Error('请输入验证码'))
} else if(value.toLowerCase()!=this.code) {
callback(new Error('验证码错误'))
}else {
callback()
}
}
return {
code: '',//验证码组件传递的code
user: {
username: '',
password: '',
code: ''//表单里用户输入的code验证码
},
// 表单提交数据校验
rules: {
username: [
{required: true, message: '请输入账号', trigger: 'blur'},
],
password: [
{required: true, message: '请输入密码', trigger: 'blur'},
],
//自定义验证方式
code: [
{ validator: validateCode, trigger: 'blur' }
],
}
}
},
created() {
},
methods:{
getCode(code){
console.log(code)
this.code=code.toLowerCase()//变小写 不区分大小写
},
login(){
//判断表单校验是否成功
this.$refs['loginRef'].validate((valid) => {
console.log(this.code)
if (valid) {
//验证通过 对后端接口发起请求,将this.user发给后台
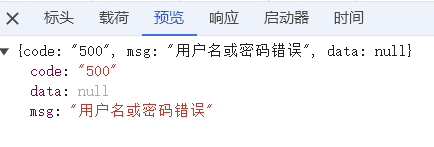
this.$request.post('/login',this.user).then(res=> {
console.log(res)
if (res.code ==='200'){
//跳转页面
this.$router.push('/')
this.$message.success('登录成功')
//存储用户数据
localStorage.setItem("user-data",JSON.stringify(res.data))
}else{
this.$message.error(res.msg)
}
})
}
})
}
}
}
</script>
<style scoped>
</style>
|
退出登录
1
|
<el-dropdown-item @click.native="$router.push('/login')">退出登录</el-dropdown-item>
|
登录接口
WebController-将user数据返回前端
 1
 2
 3
 4
 5
 6
 7
 8
 9
10
11
12
13
14
15
16
17
18
19
20
21
22
23
|
@RestController

public class WebController {
    @Resource
    UserService userService;

    @GetMapping("/")
    public Result hello(){
        return Result.success("success");
    }

        @PostMapping("/login")
    public Result login(@RequestBody User user){
        //数据校验
//        if (user.getUsername()==null||user.getUsername().isEmpty()){
//            return Result.error("数据输入不合法");
//        }
        if (StrUtil.isBlank(user.getUsername())||StrUtil.isBlank(user.getPassword())){
            return Result.error("数据输入不合法");
        }
       user= userService.login(user);
        return Result.success(user);
    }
|
加入hutool依赖
国产工具类
StrUtil.isBlank(a):检测a是否为空
1
2
3
4
5
|
<dependency>
    <groupId>cn.hutool</groupId>
    <artifactId>hutool-all</artifactId>
    <version>5.8.18</version>
</dependency>
|
userservice
 1
 2
 3
 4
 5
 6
 7
 8
 9
10
11
12
13
14
15
|
//    验证用户账号是否合法
public User login(User user) {
    //根据用户名查询数据库的用户信息
    User dbUser = userMapper.selectByUsername(user.getUsername());
    if (dbUser == null) {
        //抛出一个自定义的异常
        throw new ServiceException("用户名或密码错误");
    }
    //判断密码是否正确
    if (!user.getPassword().equals(dbUser.getPassword())) {
        throw new ServiceException("用户名或密码错误");

    }
    return dbUser;
}
|
usermapper
1
2
|
@Select("select * from `user` where username =#{username} order by id desc")
User selectByUsername(String username);
|
抛出自定义异常
exception
抛出一个自定义的异常,而不是向前端直接返回500,返回的code还是200
表示:本次http请求是成功的,但是业务是错误的
gloablException
 1
 2
 3
 4
 5
 6
 7
 8
 9
10
11
12
13
14
15
16
17
|
package com.example.springboot.exception;

import com.example.springboot.common.Result;
import org.springframework.web.bind.annotation.ControllerAdvice;
import org.springframework.web.bind.annotation.ExceptionHandler;
import org.springframework.web.bind.annotation.ResponseBody;

@ControllerAdvice
public class GlobalException {

    @ExceptionHandler(ServiceException.class)
    @ResponseBody//将result的java对象转为json
//    自定义异常
    public Result serviceException( ServiceException e){
        return Result.error("500",e.getMessage());
    }
}
|
ServiceException
1
2
3
4
5
6
7
8
|
package com.example.springboot.exception;

public class ServiceException extends RuntimeException{
//    构造方法
    public ServiceException(String msg){
        super(msg);
    }
}
|
验证码组件
conponent-ValidCode.vue
 1
 2
 3
 4
 5
 6
 7
 8
 9
10
11
12
13
14
15
16
17
18
19
20
21
22
23
24
25
26
27
28
29
30
31
32
33
34
35
36
37
38
39
40
41
42
43
44
45
46
47
48
49
50
51
52
53
54
55
56
57
58
59
60
61
62
|
<template>
  <div class="ValidCode disabled-select" style="width: 100%;height: 100%;" @click="refreshCode">
    <span v-for="(item,index) in codeList" :key="index" :style="getStyle(item)">{{item.code}}</span>
  </div>

</template>

<script>
export default {
  name: "ValidCode",
  data(){
    return{
      length:4,
      codeList:[]
    }
  },
  mounted() {
    this.createdCode()
  },
  methods:{
    refreshCode(){
      this.createdCode()
    },
    createdCode(){
      let len =this.length,
          codeList=[],
          chars='ABCDEFGHIJKLMNOPQRSTUVWXYZabcdefghijklmnopqrstuvwxyz0123456789',
          charsLen=chars.length
      //生成
      for (let i=0;i<len;i++){
        let rgb=[Math.round(Math.random()*220), Math.round(Math.random()*240),Math.round(Math.random()*200)]
        codeList.push({
          code: chars.charAt(Math.floor(Math.random()*charsLen)),
          color: `rgb(${rgb})`,
          padding: `${[Math.floor(Math.random()*10)]}px`,
          transform: `rotate(${Math.floor(Math.random()*90)-Math.floor(Math.random()* 90)}deg)`
        })
      }
      //指向
      this.codeList=codeList
      //通过update:value事件,将当前数据派发出去
      this.$emit('update:value',codeList.map(item=>item.code).join(''))
    },
    getStyle(data){
      return `color:${data.color}; font-size:${data.fontSize}; padding:${data.padding};transform:${data.transform}`
    }
  }
}
</script>

<style>
.ValidCode{
  display: flex;
  justify-content: center;
  align-items: center;
  cursor: pointer;
}
.ValidCode span{
  display: inline-block;
  font-size: 18px;
}
</style>
|
引入并使用组件,并在登录的时候校验验证码
 1
 2
 3
 4
 5
 6
 7
 8
 9
10
11
12
13
14
15
16
17
18
19
20
21
22
23
24
25
26
27
28
29
30
31
32
33
34
35
36
37
38
|
      	  <!--验证码组件-->
          <el-form-item prop="code">
            <div style="display: flex">
              <el-input prefix-icon="el-icon-circle-check"
                        size="medium" style="flex: 1" v-model="user.code"></el-input>
              <div style="flex: 1;height: 36px" >
                <!--@update:value事件得到数据-->
                <valid-code @update:value="getCode"/>
              </div>
            </div>
          </el-form-item>

		<el-form-item>
            <el-button type="primary" style="width: 100%"
                       @click="login">登 录</el-button>
        </el-form-item>
export default {
  name: "Login",
  //引入验证码组件
  components: {
    ValidCode
  },
  data() {
	return {
      code: '',//验证码组件传递过来的code
      user: {
        username: '',
        password: '',
        code: ''//表单里用户输入的验证码code
      },
  },
  methods:{
    getCode(code){
	  //获取验证码数据
      console.log(code)
      this.code=code.toLowerCase()//变小写 不区分大小写
  },
}
|
跨域问题
遇到了跨域错误
login:1 Access to XMLHttpRequest at ‘http://localhost:9090/login’ from origin ‘http://localhost:7000’ has been blocked by CORS policy: Response to preflight request doesn’t pass access control check: No ‘Access-Control-Allow-Origin’ header is present on the requested resource.
springboot解决跨域问题 -blog
 1
 2
 3
 4
 5
 6
 7
 8
 9
10
11
12
13
14
15
16
17
18
19
20
21
22
23
24
25
|
import org.springframework.context.annotation.Bean;
import org.springframework.context.annotation.Configuration;
import org.springframework.web.cors.CorsConfiguration;
import org.springframework.web.cors.UrlBasedCorsConfigurationSource;
import org.springframework.web.filter.CorsFilter;

@Configuration
public class CorsConfig {

    // 当前跨域请求最大有效时长。这里默认1天
    private static final long MAX_AGE = 24 * 60 * 60;

    @Bean
    public CorsFilter corsFilter() {
        UrlBasedCorsConfigurationSource source = new UrlBasedCorsConfigurationSource();
        CorsConfiguration corsConfiguration = new CorsConfiguration();
        corsConfiguration.addAllowedOrigin("*"); // 1 设置访问源地址
        corsConfiguration.addAllowedHeader("*"); // 2 设置访问源请求头
        corsConfiguration.addAllowedMethod("*"); // 3 设置访问源请求方法
        corsConfiguration.setMaxAge(MAX_AGE);
        source.registerCorsConfiguration("/**", corsConfiguration); // 4 对接口配置跨域设置
        return new CorsFilter(source);
    }
}
|
前端登录逻辑:
当后台返回的code是200的时候,表示验证通过
存储用户信息,然后跳转主页
后端登录逻辑:
验证用户名密码不为空,通过用户名查询数据库,验证用户是否存在
密码不匹配,说明输入错误
验证通过,返回200
注册界面
register.vue
  1
  2
  3
  4
  5
  6
  7
  8
  9
 10
 11
 12
 13
 14
 15
 16
 17
 18
 19
 20
 21
 22
 23
 24
 25
 26
 27
 28
 29
 30
 31
 32
 33
 34
 35
 36
 37
 38
 39
 40
 41
 42
 43
 44
 45
 46
 47
 48
 49
 50
 51
 52
 53
 54
 55
 56
 57
 58
 59
 60
 61
 62
 63
 64
 65
 66
 67
 68
 69
 70
 71
 72
 73
 74
 75
 76
 77
 78
 79
 80
 81
 82
 83
 84
 85
 86
 87
 88
 89
 90
 91
 92
 93
 94
 95
 96
 97
 98
 99
100
101
102
103
104
105
106
107
108
109
|
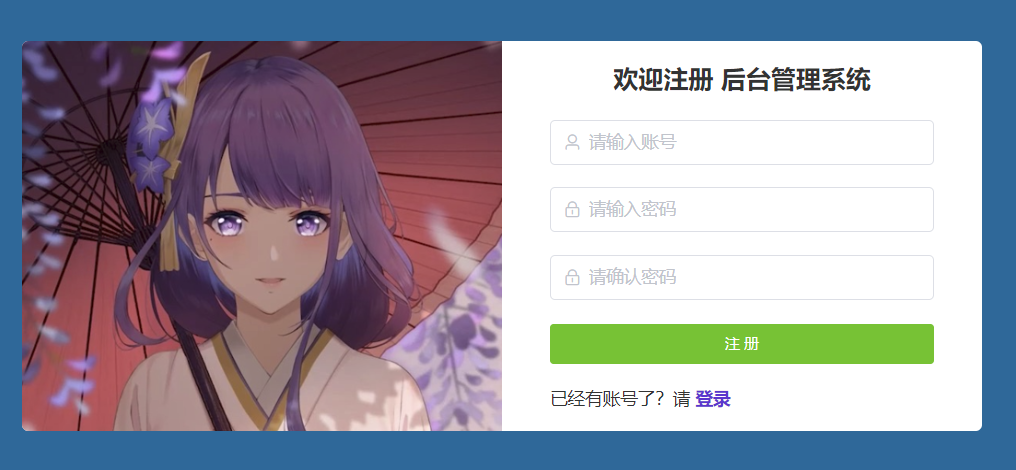
<template>
  <div style="height: 100vh; display: flex;align-items: center;justify-content: center;background-color: #0f6898">
    <div style="display: flex; background-color: white;width: 50%;border-radius: 5px;overflow: hidden">
      <div style="flex: 1;">
        <img src="@/assets/leishen.png" style="width: 100%;height: 100%">
      </div>
      <div style="flex: 1;display: flex;align-items: center;justify-content: center">
        <!--        绑定user对象-->
        <el-form :model="user" style="width: 80%" :rules="rules" ref="registerRef">
          <div style="font-size: 20px; font-weight: bold;text-align: center;margin-bottom: 20px">欢迎注册 后台管理系统</div>
          <!--          表单 prop表单校验-->
          <el-form-item prop="username">
            <el-input prefix-icon="el-icon-user" size="medium" placeholder="请输入账号" v-model="user.username"></el-input>
          </el-form-item>
          <el-form-item prop="password">
            <el-input prefix-icon="el-icon-lock" size="medium" show-password placeholder="请输入密码" v-model="user.password"></el-input>
          </el-form-item>
          <el-form-item prop="confirmPass">
            <el-input prefix-icon="el-icon-lock" size="medium" show-password placeholder="请确认密码" v-model="user.confirmPass"></el-input>
          </el-form-item>
          <el-form-item>
            <el-button type="success" style="width: 100%" @click="register">注 册</el-button>
          </el-form-item>


          <div style="display: flex">
            <!--          登录 指到变成小手-->
            <div style="flex: 1">已经有账号了?请 <span style="color: #5934cb;cursor: pointer" @click="$router.push('/login')"><strong>登录</strong></span></div>
          </div>


        </el-form>
      </div>

    </div>


  </div>

</template>

<script>


export default {
  name: "Register",

  data() {
    //自定义校验
    const validatePassword = (rule, confirmPass, callback) => {
      if (confirmPass === '') {
        callback(new Error('请确认密码'))
      } else if(confirmPass!=this.user.password) {
        callback(new Error('两次输入密码不一致'))
      }else {
        callback()
      }
    }

    return {
      user: {
        username: '',
        password: '',
        confirmPass:''
      },
      //表单提交数据校验规则
      rules: {
        username: [
          {required: true, message: '请输入账号', trigger: 'blur'},
        ],
        password: [
          {required: true, message: '请输入密码', trigger: 'blur'},
        ],
        confirmPass: [
          { validator: validatePassword, trigger: 'blur' }
        ],
      }
    }
  },
  created() {
  },
  methods:{
    register(){
      //判断表单校验是否成功
      this.$refs['registerRef'].validate((valid) => {
        console.log(this.code)
        if (valid) {
          // 验证通过 对后端接口发起请求
          this.$request.post('/register',this.user).then(res=> {
            console.log(res)
            if (res.code ==='200'){
              //跳转页面
              this.$router.push('/login')
              this.$message.success('注册成功')
            }else{
              this.$message.error(res.msg)
            }

          })
        }
      })
    }
  }
}
</script>

<style scoped>

</style>
|
router-index.js写入路由
1
2
3
|
{
  path: '/register',name:'Register',component: () => import('../views/Register.vue')
}
|
页面跳转
1
|
<div style="flex: 1">还没有账号?请 <span style="color: #0f9876;cursor: pointer" @click="$router.push('/register')">注册</span></div>
|
注册接口
controller
 1
 2
 3
 4
 5
 6
 7
 8
 9
10
11
12
|
@PostMapping("/register")
public Result register(@RequestBody User user){

    if (StrUtil.isBlank(user.getUsername())||StrUtil.isBlank(user.getPassword())){
        return Result.error("数据输入不合法");
    }
    if (user.getUsername().length()>10||user.getPassword().length()>20 ){
        return Result.error("数据输入不合法");
    }
    user= userService.register(user);
    return Result.success(user);
}
|
service
 1
 2
 3
 4
 5
 6
 7
 8
 9
10
11
12
|
    public User register(User user) {

        User dbUser = userMapper.selectByUsername(user.getUsername());
        //用户已存在
        if (dbUser != null) {
            //抛出一个自定义的异常,而不是向前端直接返回500,返回的code还是200
            throw new ServiceException("用户名已存在");
        }
//        user.setName("dog-"+ RandomUtil.randomNumbers(4));
        user.setName(user.getUsername());
        userMapper.insert(user);
        return user;
|
JWT token实现权限验证
JWT:Json Web Token。JWT 是JSON风格轻量级的授权和身份认证规范,可实现无状态、分布式的Web应用授权。是基于token的一种授权认证方式。就是一个字符串,经过加密处理与校验处理的字符串。JWT可以使用HMAC算法或者是RSA的公私秘钥对进行签名。
pom.xml添加依赖
1
2
3
4
5
6
|
<!--jwt依赖-->
<dependency>
    <groupId>com.auth0</groupId>
    <artifactId>java-jwt</artifactId>
    <version>4.3.0</version>
</dependency
|
修改自定义异常
 1
 2
 3
 4
 5
 6
 7
 8
 9
10
11
12
13
14
15
16
17
18
19
20
21
22
23
24
25
|
@Getter
public class ServiceException extends RuntimeException{
    private final String code;

//    构造方法
    public ServiceException(String msg){
        super(msg);
        this.code= "500";//默认的code
    }
    public ServiceException(String code,String msg){
        super(msg);
        this.code=code;//自定义
    }
}

@ControllerAdvice
public class GlobalException {

    @ExceptionHandler(ServiceException.class)
    @ResponseBody//将result的java对象转为json
//    自定义异常
    public Result serviceException( ServiceException e){
        return Result.error(e.getCode(),e.getMessage());
    }
}
|
自定义拦截器
JwtInterceptor
 1
 2
 3
 4
 5
 6
 7
 8
 9
10
11
12
13
14
15
16
17
18
19
20
21
22
23
24
25
26
27
28
29
30
31
32
33
34
35
36
37
38
39
40
41
|
public class JwtInterceptor implements HandlerInterceptor {

    @Resource
    private UserMapper userMapper;
    @Override
    public boolean preHandle(HttpServletRequest request, HttpServletResponse response,Object handle) {

        //header里面传来的参数
        String token=request.getHeader("token");
        if (StrUtil.isBlank(token)){
            //url参数  ?token=xxx
            token=request.getParameter("token");
        }
        //执行认证 没有token抛出异常
        if (StrUtil.isBlank(token)){
            throw new ServiceException("401","请登录");
        }
        //获取token中的userid
        String userId;
        try {
            userId= JWT.decode(token).getAudience().get(0);
        }catch (JWTDecodeException j){
            throw new ServiceException("401","请登录");
        }
        //根据token中的userid查询数据库,字符串转为数字
        User user = userMapper.selectById(Integer.valueOf(userId));
        if (user ==null){
            //数据库中查不到数据
            throw new ServiceException("401","请登录");
        }
        //通过用户密码加密之后生成一个验证器
        JWTVerifier jwtVerifier = JWT.require(Algorithm.HMAC256(user.getPassword())).build();
        try {
            jwtVerifier.verify(token);//验证token
        } catch (JWTVerificationException e){
            throw new ServiceException("401","请登录");
        }
        return true;

    }
}
|
401:权限错误
拦截器配置
InterceptorConfig
 1
 2
 3
 4
 5
 6
 7
 8
 9
10
11
12
13
14
15
|
@Configuration
public class InterceptorConfig extends WebMvcConfigurationSupport {

    @Override
    protected void addInterceptors(InterceptorRegistry registry){
        registry.addInterceptor(jwtInterceptor())//配置jwt的拦截器规则
                .addPathPatterns("/**");//拦截所有的请求路径
        super.addInterceptors(registry);
    }

    @Bean
    public JwtInterceptor jwtInterceptor(){
        return new JwtInterceptor();
    }
}
|
token工具类
TokenUtils
 1
 2
 3
 4
 5
 6
 7
 8
 9
10
11
12
13
14
15
16
17
18
19
20
21
22
23
24
25
26
27
28
29
30
31
32
33
34
35
36
37
38
39
40
|
public class TokenUtils {

    private static UserMapper staticUserMapper;

    @Resource
    UserMapper userMapper;

    @PostConstruct
    public void setUserService(){
        staticUserMapper=userMapper;
    }
    /**
     * 生成token
     */
    public static String createToken(String userId,String sign){
        return JWT.create().withAudience(userId)//将userid保存到token里面,作为荷载
                .withExpiresAt(DateUtil.offsetHour(new Date(),2))//2小时后token过期
                .sign(Algorithm.HMAC256(sign));//以password作为token的密钥
    }
    /**
     * 获取当前登录的用户对象
     * 前端请求带了token,就可以知道当前用户是谁在请求
     * 解析token,拿到当前user信息
     */
    public static User getCurrentUser(){
        try {
            HttpServletRequest request =((ServletRequestAttributes) RequestContextHolder.getRequestAttributes()).getRequest();
            String token=request.getHeader("token");
            if (StrUtil.isNotBlank(token)){
                String userId = JWT.decode(token).getAudience().get(0);
                return staticUserMapper.selectById(Integer.valueOf(userId));
            }
        }catch (Exception e){
            return null;
        }
        return null;
    }


}
|
生成token
在user实体类中添加token对象
userservice中生成token,并传进user—验证user合法之后
 1
 2
 3
 4
 5
 6
 7
 8
 9
10
11
12
13
14
15
16
17
18
|
    //    验证用户账号是否合法
	public User login(User user) {
        //根据用户名查询数据库的用户信息
        User dbUser = userMapper.selectByUsername(user.getUsername());
        if (dbUser == null) {
            //抛出一个自定义的异常,而不是向前端直接返回500,返回的code还是200
            throw new ServiceException("用户名或密码错误");
        }
        if (!user.getPassword().equals(dbUser.getPassword())) {
            throw new ServiceException("用户名或密码错误");

        }
        //生成token userid放进token,password验证token
        String token = TokenUtils.createToken(user.getId().toString(), user.getPassword());
        dbUser.setToken(token);

        return dbUser;
    }
|
此时登录会报错:
{“code”:“401”,“msg”:“请登录”,“data”:null}
说明登录接口被拦截(addInterceptors拦截所有的请求路径)
- 解除login的拦截。此时login请求成功,seletall请求失败,login中拿到了token
1
2
3
4
5
6
7
|
protected void addInterceptors(InterceptorRegistry registry){
    registry.addInterceptor(jwtInterceptor())//配置jwt的拦截器规则
            .addPathPatterns("/**")//拦截所有的请求路径
            .excludePathPatterns("/login");//排除拦截

    super.addInterceptors(registry);
}
|
 1
 2
 3
 4
 5
 6
 7
 8
 9
10
11
12
13
14
15
|
{
    "code": "200",
    "msg": "请求成功",
    "data": {
        "id": 14,
        "username": "admin",
        "password": "admin",
        "name": null,
        "phone": null,
        "email": null,
        "address": null,
        "avatar": null,
        "token": "eyJ0eXAiOiJKV1QiLCJhbGciOiJIUzI1NiJ9.eyJhdWQiOiIxNCIsImV4cCI6MTcyNDczNjQ5NX0.2EFDXBvKmgGQY8NeirMbjpbBO3TVveSSo3nLIDBe72I"
    }
}
|
在前端有了token,需要在所有接口都加上token
前端登录成功后,数据保存到了 user-data中
1
2
|
//login.vue
localStorage.setItem("user-data",JSON.stringify(res.data))
|
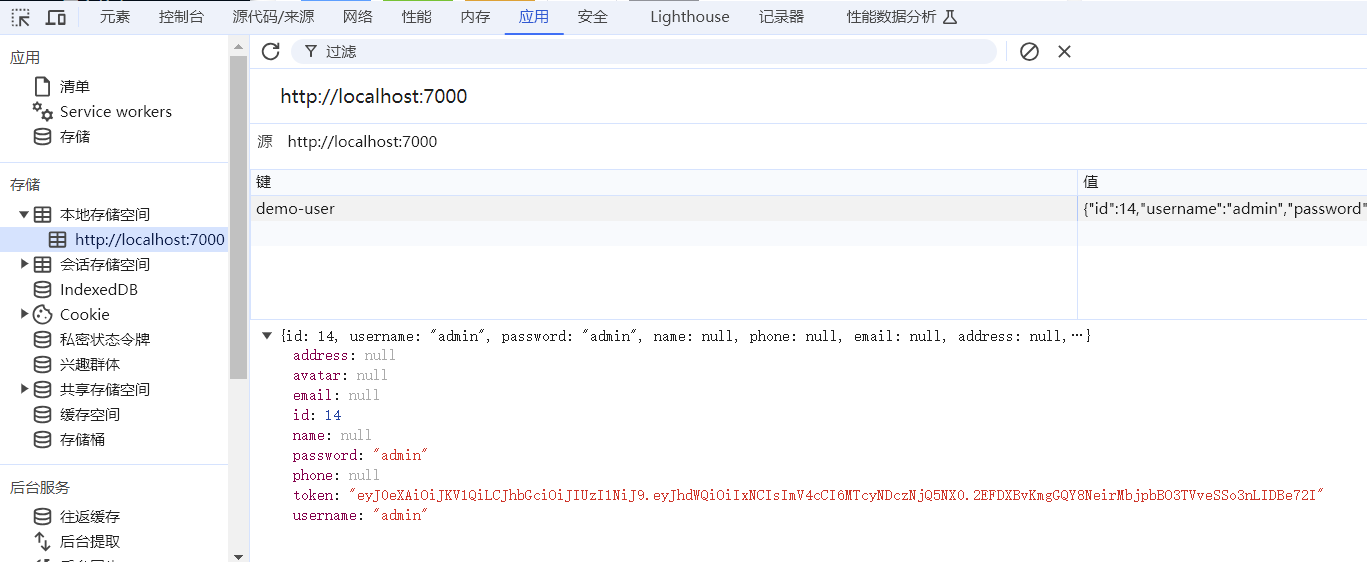
在请求工具request.js中 添加请求头token
 1
 2
 3
 4
 5
 6
 7
 8
 9
10
11
12
|
//定义请求参数 request拦截器 可以自请求发送前对请求做一些处理,比如统一加token,对请求参数统一加密
request.interceptors.request.use(config =>{
    config.headers['Content-Type']='application/json;charset=utf-8';
    //拿到user对象 拿到token
    let user = JSON.parse(localStorage.getItem("user-data")||'{}')
    //设置请求头
    config.headers['token'] = user.token
    return config
},error => {
    console.error('request error: '+error)
    return Promise.reject(error)
})
|
此时selectall请求成功,请求头中包含了token,就是登录接口返回的token,在每次请求的时候都会带着token作为验证信息
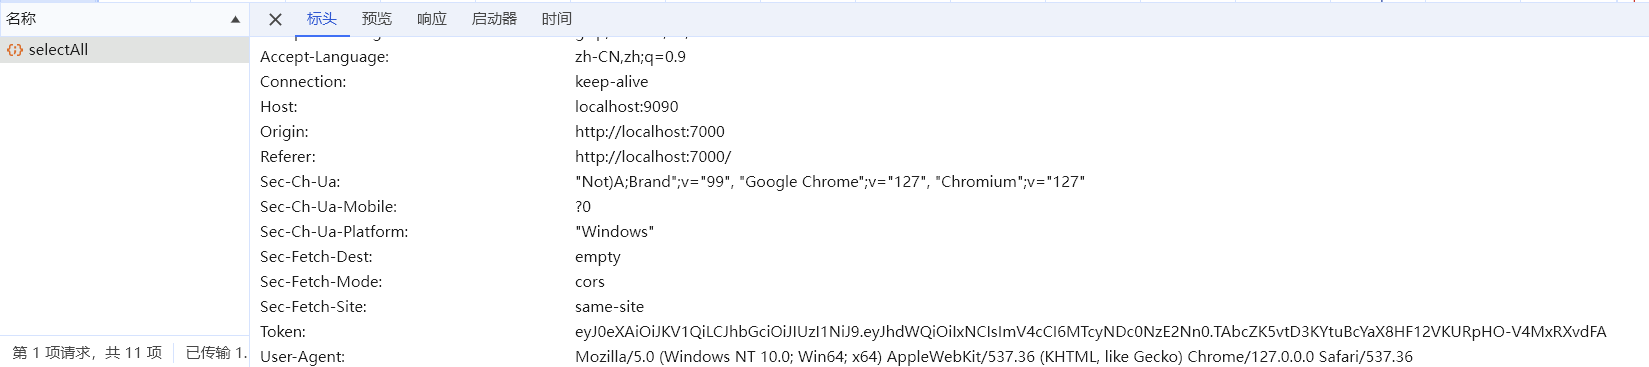
在应用界面,清除本地存储空间,数据就加载不出来了,http://localhost:9090/selectall访问不了
没有权限,跳转登录界面
 1
 2
 3
 4
 5
 6
 7
 8
 9
10
11
12
13
14
15
16
17
18
|
request.interceptors.response.use(
    response=>{
        let res=response.data;
        //兼容服务器端返回的字符串数据
        if(typeof res==='string'){
            res=res ? JSON.parse(res) : res
        }
        //没有权限,跳转到登录界面
        if (res.code === '401'){
            router.push("/login")
        }
        return res;
    },
    error => {
        console.error('response error: '+error)
        return Promise.reject(error)
    }
)
|
退出登录后,清理本地存储的token
homeview.vue
 1
 2
 3
 4
 5
 6
 7
 8
 9
10
|
<el-dropdown-item @click.native="logout">退出登录</el-dropdown-item>
methods: {
    logout(){
   		//清除本地存储用户数据和token
      	localStorage.removeItem('user-data')

      	//跳转登录页面
      	this.$router.push('/login')
    },
},
|
但是注册也会被拦截,通过自定义注解,解除拦截
自定义注解
AuthAccess
1
2
3
4
5
|
@Target(ElementType.METHOD)
@Retention(RetentionPolicy.RUNTIME)
@Documented
public @interface AuthAccess {
}
|
JwtInterceptor
 1
 2
 3
 4
 5
 6
 7
 8
 9
10
11
12
13
14
15
16
17
18
19
20
21
22
23
24
25
26
27
28
29
30
31
32
33
34
35
36
37
38
39
40
41
42
43
44
45
46
47
48
49
50
|
public class JwtInterceptor implements HandlerInterceptor {

    @Resource
    private UserMapper userMapper;
    @Override
    public boolean preHandle(HttpServletRequest request, HttpServletResponse response,Object handle) {

        //header里面传来的参数
        String token=request.getHeader("token");
        if (StrUtil.isBlank(token)){
            //url参数  ?token=xxx
            token=request.getParameter("token");
        }

        //通过这个方法可以拿到自定义的注解AuthAccess
        //如果包含注解直接通过,不需要后续认证 直接通过
        if (handle instanceof HandlerMethod){
            AuthAccess annotation=((HandlerMethod) handle).getMethodAnnotation(AuthAccess.class);
            if (annotation !=null){
                return true;
            }
        }
        //执行认证 没有token抛出异常
        if (StrUtil.isBlank(token)){
            throw new ServiceException("401","请登录");
        }
        //获取token中的userid
        String userId;
        try {
            userId= JWT.decode(token).getAudience().get(0);
        }catch (JWTDecodeException j){
            throw new ServiceException("401","请登录");
        }
        //根据token中的userid查询数据库,字符串转为数字
        User user = userMapper.selectById(Integer.valueOf(userId));
        if (user ==null){
            //数据库中查不到数据
            throw new ServiceException("401","请登录");
        }
        //通过用户密码加密之后生成一个验证器
        JWTVerifier jwtVerifier = JWT.require(Algorithm.HMAC256(user.getPassword())).build();
        try {
            jwtVerifier.verify(token);//验证token
        } catch (JWTVerificationException e){
            throw new ServiceException("401","请登录");
        }
        return true;

    }
}
|
controller 添加注解
1
2
3
4
|
@AuthAccess
@PostMapping("/register")
public Result register(@RequestBody User user){
}
|